Part III Individual Project
Matthew Barnes
Outline Project Schedule and Deliverables 3
Redeeming a Low Project Mark 11
|
Event |
Description |
|
Project Preference Selection (Summer term) |
Supervisors update preferences consisting of:
Students (you) then go through two stages:
You need to do this or else you can’t do your third year project. |
|
Supervisor Allocation |
During the summer exams, supervisors are assigned students using an algorithm (stable marriage).
It uses your preferences; supervisor preferences are only taken into account when there aren’t enough places to go around. |
|
Initial Meeting |
You must meet up with your supervisor to discuss your project.
You two should agree on a project, suggested either by:
You should also do some background reading during the summer to get you ready.
For every other meeting there’s this weekly report form. This one’s a bit crap, but making your own is a really handy way of getting all your information into one place to make the meetings more efficient. |
|
Agreed Project Brief (Autumn term) |
Your first piece of submitted work.
You must do this during the first week of term.
It is a description of your project, agreed between you and your supervisor.
It’s one side of A4 containing:
You’ll hand it in electronically, so no need to print it out. |
|
Second Examiner Allocation |
You will be allocated your second examiner.
You should make an appointment to discuss your project with them.
Your project brief will form the basis of this discussion (they will have an electronic copy of it). |
|
Progress Report (Autumn term) |
Your second piece of submitted work.
Towards the end of semester 1, you’ll need to write a 3,000 word progress report.
You should include:
It needs to follow the project report standards mentioned below.
You also need to submit two versions of your report:
Again, more information in the project report standards section.
The archive version will be printed and sent to your supervisor.
You can submit this early if you need any facilities or financial support.
It’s worth 10% of the marks and only your supervisor marks it. You will be penalised 10% for each day it is late, and after the 5th day the mark will be set to zero. |
|
Final Report (Summer term) |
Your third piece of submitted work.
Shortly after the Easter break, you need to submit a 10,000 word final report.
Diagrams and equations may add to the page count.
You should include:
This report should also compare the project plans set out in the brief and the progress report with your actual achievements:
Appendices may include a user manual, circuit diagrams etc. You should agree with your supervisor on your appendices.
You won’t be marked down for writing “too much” or “too little”.
There are three stages to submission:
The submission process is complete after submitting the files, so take your time with the questionnaire.
Two copies of the archive version will be printed and handed out to your examiners.
Bring your own copy of your report during the viva.
If you fail to hand in, you’ll be penalised 10% each day, and after 5 days the mark will be set to zero.
The award of an honours degree depends on the submission of this report. |
|
Project Viva |
You will meet with both your examiners and demonstrate, describe and discuss your project.
It’ll last around 30-40 minutes, taking place just before the semester 2 exams. It’s worth 10% of the marks.
If the staff wish to vary dates, they’ll let you know.
You’ll need to show off your project, however that may be hard in the time given. If you need more time, talk to your supervisors.
You’re not only showing off your work; you’re also showing off your understanding. They’ll bombard you with questions, but that’s alright, because you’ll be prepared and ready to defend yourself and your project.
The second examiner will be leading the questioning.
Don’t worry if they ask you a question you cannot answer! Just do your best and don’t panic.
Discuss the viva format with your supervisors before you start preparations; some examiners expect different things. |
|
Third Examiners |
If the two examiners cannot agree on a mark, a third examiner may be called in.
The third examiner may want to see a second viva.
If that happens, it’ll usually be arranged in one of the second semester exam weeks (within 3 weeks of the first viva). |
|
Completion |
If you borrowed anything, or bought anything with your project budget, it must be returned to the university.
This includes reports from the archive, equipment from stores, sundry items etc.
If you’re doing a design / build project, you’ll be handing over a completed piece of hardware for later students to use. |
|
Standard |
Description |
|
Target Audience |
Who’s going to read your report? Engineers? Big wigs?
Well, your examiners are going to see it.
Just assume your target audience is a student in your course in the year below you starting their third term.
If you’re really not sure, talk to your supervisor. |
|
General Guidelines |
The report should be on A4.
Text should be 12pt in a serif font, like Palatino, Times or Computer Modern.
Reports will be printed double sided.
Binding margin should be at least 35mm.
Other margins should be at least 24mm.
Page numbers, headers and footers can lie outside the top and bottom margins.
Use paragraphs, but don’t indent them. Separate them with an empty line.
Make it formal, not conversational or narrative (like these notes).
Make sure your spelling is right (it’s the 21st century, use Word or something)
Diagrams can either be computer generated or scanned, and they should be put next to the text that they relate to.
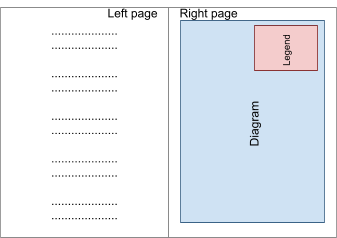
Landscape diagrams can be rotated 90 degrees to fill up a portrait page, along with a legend along the bottom. For example, like this:
... so the reader will rotate the document 90 degrees clockwise to see your diagram.
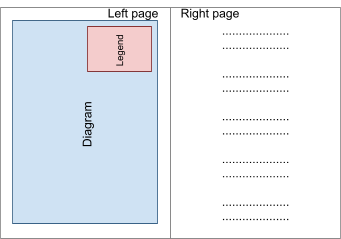
This also includes diagrams on the left page:
All pages should be numbered, including the main body and appendices.
Chapter and section numbers should be done in ‘legal’ style (e.g. 2.3.1 represents chapter 2, section 3, sub-section 1. If you use Latex you’re doing it already). |
|
Title Page |
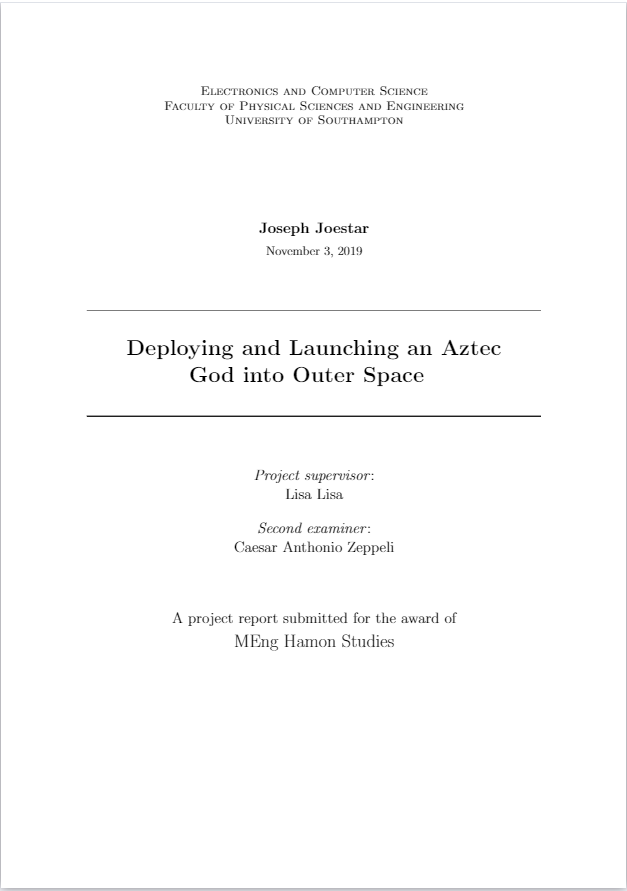
The title page should look like this:
Electronics and Computer Science Faculty of Physical Sciences and Engineering University of Southampton
<Author> <Date>
<Project Title>
Project supervisor: <Supervisor> Second examiner: <2nd Examiner>
A project [progress] report submitted for the award of <Degree title>
The <something> should be replaced with the appropriate text.
The [progress] is included for the progress report, but not for the final report (without the square brackets, obviously).
Using LaTeX and you can’t be bothered to copy out this layout? Don’t worry, I’ve made a template for you here. |
|
Report Structure |
Your report will typically have this structure:
n-1. Reviewing progress and results n. Conclusion and proposal of further work / ideas
Supervisors can help with the structure of the report, but nothing further; that’s your job! |
|
Appendices |
Includes supporting material agreed with your supervisor.
The format here isn’t very strict, as long as it’s readable.
If you have a design and build project, put your cost breakdown here.
Program listings aren’t normally put here, but if you need to, use a monospaced font.
The table of contents for the archive should be put here, too. |
|
Proper Referencing |
Have you ever scrolled down to the bottom of Wikipedia and looked at all the references?
Did you ever notice things like [1] on Wikipedia documents?
That’s what you’re going to be doing for this report!
To reference, you need to add a [x] at the end of a citation, where ‘x’ is the number ID of the reference in your References section: |
|
The wiki page gives details about Johnny Joestar [1].
Johnny Joestar is “the seventh JoJo of the JoJo’s Bizarre Adventure series” [1].
Johnny is “a former horse-racing prodigy turned paraplegic” [1], making him the first disabled JoJo.
References: [1] https://jojo.fandom.com/wiki/Johnny_Joestar
(Please don’t actually reference wikis; this is just an example) |
|
|
The first sentence just talks about the reference itself; we’re not making a statement that is supported by the reference. That’s fine.
The second and third sentences have direct quotes from the reference encapsulated in quotation marks. That’s also fine.
However, what’s not fine is this: |
|
|
Johnny wanted to win the Steel Ball Run race because he wanted to heal his legs [1]. |
|
|
Here, we are making a statement that is supported by the reference.
There's no direct quote, so we must be paraphrasing.
Usually, paraphrasing is ok, but be careful that you don't make your citation too iffy (like this one). The problem with this one is that it's not exactly what the citation is saying.
Paraphrasing should only be a summary using your own words; do not change the original point or do a "change the words so the teacher doesn't notice".
In addition, do not make the same point the citation is making. Reflect on it and make a new point using the citation.
So how do we make our point without plagiarism?
It depends on what you want to say, but in this example, we could do: |
|
|
Johnny joined the Steel Ball Run race after learning about Gyro’s Steel Balls as they are capable of healing his legs [1]. |
|
|
This is what the citation actually meant, so we'll be safe. It's not a direct quote but it's ok.
TL;DR use [x] to cite, you can use direct quotes and you can paraphrase (summarise) but make sure you reflect on the citation. |
|
|
Report Production |
ECS will be responsible for the printing of project reports based on submitted PDF files. |
|
Colour |
Use colour sparingly, because printing black and white is cheaper. |
|
PDF Files |
Two PDF files must be submitted:
|
|
Word Count |
The word count starts with the first word of the introduction and ends with the last word of the conclusion.
Basically, it’s the total word count in the Plagiarism Checking version. |
\documentclass[a4paper,twoside]{article}
\usepackage[a4paper, total={6in, 9in}, inner=4cm, outer=3cm]{geometry}