Automated Code Generation
Matthew Barnes
Introduction 3
History of Software Reuse 3
Our solution 5
Concepts in Code Generation 6
Code Generator Structure 7
Code Generation Approaches 8
Transformations 9
Domain Modelling 11
C Macros 14
Macros 14
Macros in Code Generation 14
Macro Operators 15
Coding Idioms with Macros 15
Macro Hygiene 16
Why Syntax Macros Suck 16
Hygienic Macros 18
C++ Templates 21
Templates in C++ 21
Template Parameters 23
Templates are Syntactic Macros 24
Why C++ Templates Suck 25
Templates Specialisation in C++ 25
Template Metaprogramming 30
IF<> 30
WHILE<> 31
Loop Unrolling 32
ADTs 35
Expression Templates 37
Aspect Oriented Programming with AspectJ 38
Aspect Oriented Programming Concepts 38
Introduction to AspectJ 41
Call vs Execution 43
State-Based Pointcuts 43
Class JoinPoint 45
Advice Placement 45
CFlow 46
Inter-Type Declarations 47
Why AspectJ Sucks 48
Quote-Based Metaprogramming 48
Entry Points 50
Using ` and # 51
Using infer 52
Unquote Splice 52
Convenience Methods 53
Why Meta-AspectJ Sucks 55
Transformative Code Generation 55
Let’s Get Meta! 56
Listeners 60
Software Sec Example 64
Visitors 68
Binary Tree Example 69
Other Features 74
Alternative Labels 74
Rule Element Labels 74
Actions 75
Node Values (Attributes) 75
TokenStreamRewriter 76
Why ANTLR Sucks 78
Introduction
-
Hello! Welcome to the Automated Code Generation
Notes.
-
If you find any mistakes or have any questions, please feel
free to leave a comment or make a suggestion.
-
Don’t feel bad about bothering me; I really am quite
happy to see what you have to say / want to change!
-
With that out of the way, let’s jump straight
in!
History of Software Reuse
-
Throughout history, programmers have re-used
software.
-
This is based on:
-
Abstraction (providing an intuitive API / interface with no mess)
-
Encapsulation (splitting everything up into easy-to-digest modules)
-
There’s loads of ways to use reusable software:
-
Function libraries (SDL, Lodash, NumPy, ...)
-
Components (Java Beans, React / Vue libraries, ...)
-
Dedicated “processors” (SQL processors)
-
Frameworks (Eclipse, Ruby on Rails, Angular, ...)
-
Design patterns (Singleton, Delegation, ...)
-
Middleware systems (Android libraries form middleware between Linux kernel and
applications)
-
Only problem is...
-
... they suck.
-
Why do they suck?
-
Libraries and components suck because:
-
Encapsulation can prevent optimisation (running two methods from a library may be less efficient
than running code that conjoins the two operations)
-
Static error checking is limited
-
Combinatorial explosion (library scaling could go too far;
‘bloat’)
-
APIs too large / difficult (like library scaling, plus there’s too much
boilerplate code)
-
Framework evolution (interaction between framework and completion code
needs constant updating)
-
Middleware sucks because:
-
APIs too large / difficult
-
Runtime overheads (enforcement of middleware protocol at runtime)
|
Example: Why Libraries Suck
|
-
Let’s give a little example.
-
We have a library for matrix arithmetic,
and we want to do this operation:
-
Using this library, we could implement it
this way:
-
add(A, B, M)
-
transpose(M, C)
-
Substituting in the function bodies, our
code would really be:
-
That looks fine, right?
-
Hmm... it could be better.
-
We could optimise this into one loop:
-
... but because our library is split into
different operations, we can’t do it
that way.
|

Automated Code Generation: “Everything you love
sucks.”
-
What’s the cause of this sucky-ness?
-
Geek Egoism: Insufficient / wrong abstractions
-
Written for the developers, not for the actual end
users
-
Embodiment: Functionality == components
-
Concepts don’t exactly map one-to-one with
components
-
Concepts like:
-
Distribution (using across networks)
-
Security
-
Persistence (persist data for our system)
-
Linguistic poverty: Host language restrictions
-
Cannot extend syntax to reflect domain notations
-
For example there is no ‘transpose’ operator in
Java
-
Other syntax include:
-
Mathematical operators
-
Regular expression
-
Parser combinators
-
SQL query syntax
-
Alright, we get it.
-
Everything we’ve known and used is crap, and we
should feel bad.
-
So, what? We go Terry A. Davis and write our own compilers from scratch?
-
We don’t have to go that extreme...
(By the way, I was joking about everything sucking.
You can continue to use libraries and such if you wish.)
Our solution
-
We use code generation!
-
With code generation, we can:
-
use better abstractions by considering programs as data
objects
-
use more powerful mechanisms with meta-programming
-
use better languages that capture domain-specific
abstractions
-
We make computers do the programming!

Um... that’s not quite what I meant.
-
To put it a better way, we can call this “automation
of programming”.
-
We kind of do this already, especially in the C / C++
language.
-
If you didn’t know, an array in C / C++ is just a
pointer to the start of the array.
-
So when you do:
-
In addition, preprocessor directives are kind of like code generation, too.
-
#define MAX(x,y) x > y ? x : y
-
...
-
int a = 10, b = 20;
-
MAX(a,b) /* This will be changed to a > b ? a : b after compilation */
-
There’s even more ways we do code generation, like templates, which are “macros for classes”, and aspects, which are code fragments “woven” into base
code.
-
Programming can also be automated using dedicated separate
tools.
-
There’s ones like:
-
lex / yacc scanner / parser generators
-
Input: grammar rules with embedded action code
-
Output: code comprising of:
-
table data structures
-
driver code (boilerplate)
-
action code spliced in at correct locations
-
Generator: implementation of LR-parsing theory
-
JavaCC scanner / parser generator
-
Input: grammar rules with embedded action code
-
Output: code comprising of:
-
functions for recursive descent parsing rules
-
driver code (boilerplate)
-
action code spliced in at correct locations
-
Generator: implementation of LL-parsing theory
-
Input: system configuration represented in GUI
-
Output: code skeleton
-
Generator: traverses system structure, emits text
Concepts in Code Generation
-
Code generation can be roughly defined as:
-
“Automatic derivation of source code in a
conventional language from an input model.”
-
It’s like compilation, except there’s a bigger
semantic gap.
-
In compilers, you go from source code → AST.
-
In code generators, you can interleave and/or repeat steps
(search & control).
-
In addition, code generators are more
knowledge-intensive.
-
Without code generators, development processes go like this:
-
However, with code generators, development processes go like this:

-
Code generators reduce the conceptual gap, as well as
formalises and internalises domain and design
knowledge.
-
Just because it’s called code generation doesn’t mean it has to generate
code.
-
It can generate a load of other things too:
-
Documentation (man pages)
-
Installation and control scripts
-
Test data, test data generators, and simulations
-
Proofs of safety, effectiveness, correctness
-
Trace information between model and code (so when something goes wrong in the code, you know exactly
where the problem lies in the model, too)
-
In case you didn’t get enough from the intro,
here’s why we should use code generation:
-
Fast turn-around from high-level spec to system
implementation
-
Re-generate for new platform
-
Increased level of intentionality
-
Algorithms represented in domain-specific concepts (instead of convoluted low-level code)
Code Generator Structure
-
So what does a code generator actually look like?
- Like this:
-
Oof... that’s a lot to take in at once.
-
Let’s try to make sense of this:
-
We have a model, which is text, written in a language with a given grammar.
-
We can parse its AST, as well as extract information into a transformation database.
-
We can perform some basic transformations that are baked into the code generator itself, as well as some additional transformations extracted from the model.
-
We can reflect and reason upon our transformations using meta-information
from the grannar.
-
At the end, we can generate an AST of the generated code,
and unparse it into generated source code, using some given
grammar.
-
If that made no sense, don’t worry; hopefully
it’ll make more sense later on in the module.
-
For now, just think this:
-
Feed generator model
-
Generator parses AST from model
-
Generator uses engine, transformation database, and
meta-information to perform transformations
-
Generator unparses AST into output source code
Code Generation Approaches
-
There are different kinds of code generators.
-
These categories are called paradigms.
-
Like how programming languages are within a spectrum of
paradigms (a language can have OOP and functional elements), code generators are within a spectrum of paradigms
too.
-
Here they are, given by main operation or data structure:
|
Generative or code-based
-
Assemble code from fragments
-
Macros, C++ templates, aspects
-
Template engines (JET, Velocity, ...)
|

|
|
Transformative or model-based
|
|
Deductive or proof-based
-
Logically deduce code from
specification
-
Amphion, KIDS / PlanWare/ SpecWare,
...
|
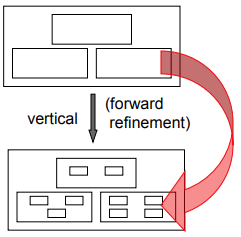
Transformations
-
There are different “software transformations”
that a generator can make.
-
Horizontal transformations:
-
Evolution: evolve specification
-
Refactoring: evolve architecture
-
Vertical transformations:
-
Refinement: implement / refine to code
-
When we say the words “horizontal” and
“vertical”, that insinuates we have dimensions
to “transform” around.
-
The vertical dimension is like our level of
abstraction.
-
If we’re really high, we’re talking about our
domain-specific language; really high level stuff.
-
If we’re really low, we’re talking about system
implementation; low level stuff.
-
The horizontal dimension is like our semantics.
-
As we move around this dimension (take horizontal transformations), we are changing things, refactoring, optimising etc. and
generally changing the semantics of our model.
-
In terms of transformations, there are two kinds of
generators:
|
Compositional
-
Compositional generators only apply
vertical transformations.
-
It was introduced by Batory, and is typical
for CASE tools; models built with
GUIs.
-
They preserve structure, because semantics
do not change. This way, generated code can
be traced back to the initial model.
|
|
|
Holistic
-
Holistic generators apply both vertical and
horizontal transformations.
-
In other words, “whole system”
transformations, capable of:
-
Optimisation
-
Refactoring
-
Weaving
-
However, some transformations are a
combination of both vertical and horizontal
transformations, called oblique transformations.
-
These transformations can bridge bigger
semantic gaps.
|

|
|
Example: Oblique Transformations
|
-
If you want an example of an oblique transformation, think of the matrix add + transpose example we had in the introduction, but
instead, our “model” looks like
this:
-
We could take a horizontal step to optimise
the model:
-
Then, a vertical step to implement the
model:
-
This can all be done in a single oblique
transformation!
|
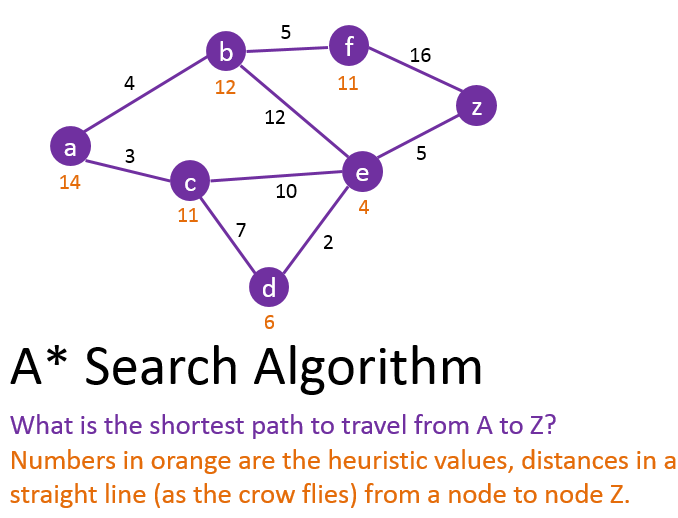
I said Holistic, not Heuristic!
Domain Modelling
-
We need a way of expressing our domain of interest.
-
Therefore, we need to model it.
-
For example, if we’re creating physics simulation
software, we need to model objects, how they behave, physics
rules etc.
-
When we do domain modelling, we need to establish and define:
-
Vocabulary (keywords, GUI widgets etc.)
-
Concepts and roles
-
Features / Options
-
We need to define common and variable properties of the
systems:
-
we need to define common architectures
-
The starting point of code generation is to get your domain
model right.
-
As they say:
“Good domains (for code generation) have good domain
models!”
- Julian Rathke
-
Domain modelling schlomain modelling... this stuff is
easy.
- Right?
- Wrong!
-
It’s quite hard to model a domain, because:
-
it requires a lot of domain experience
-
experts think about things too abstractly for code
generation
-
What we mean by “abstract” is, for example,
domain concepts that are all maths.
-
As a programmer, you know that code is not maths. Maths is
way higher level.
-
In some domains, it’s so high level that it’s a
real challenge porting that to code.
-
In other words, it’s too declarative.

Domain experts
-
Domain modelling requires a formal modelling language.
-
Which one? There’s:
-
Classes → concepts
-
Relations → roles
-
OCL to restrict combinations
-
Graphical editors (e.g. CRAFT, used for ontologies)
-
Transformation tools
-
Others such as description logics
-
Generative domain modelling must cover problem space and solution space.
-
In other words, it transforms:
-
from the problem space (our high-level domain model)
-
to the solution space (our low-level implementation)
-
Here’s the illustration from the slides
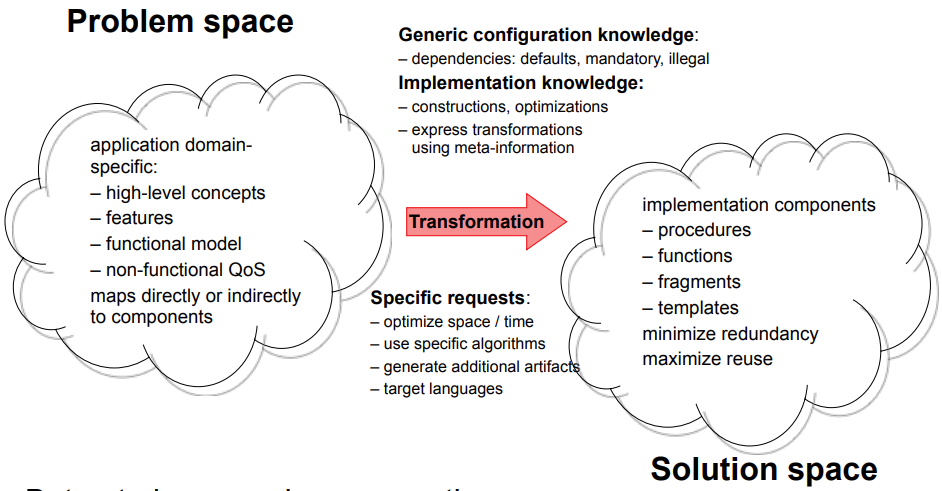
-
However, there’s not always a clear-cut separation
from problem and solution space.
-
Therefore we use solution concepts.
-
Solution concepts are code fragments and structures in the domain
model.
-
They can also provide relevant variables and types for
given parts of the model.
-
They can be difficult to express, as they need to have an
order and dependencies.
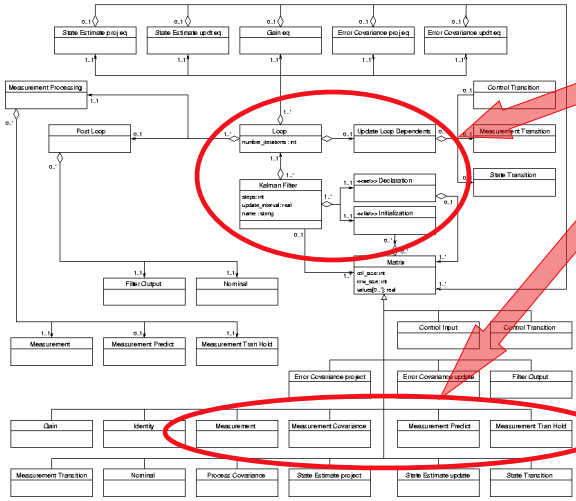
The red circled bits are solution concepts and variables +
types inside the UML model.
-
They may need to use specialised notation (which may not be available in languages such as UML).
-
Feature models are also quite hard to express as
well.
-
Did you really think you’d be writing generators from
scratch?
-
There are generator frameworks that provide dedicated tools to build generators.
-
They provide tools for:
-
Meta-modelling (MetaEdit+, GME, ...)
-
Meta-programming (C++ templates, ...)
-
Transformation and search (Stratego, ...)
-
They are used to build themselves (bootstrapping)
-
Requires metamodel of the system (UML defined within metamodel)
-
Supports customisation
-
Modify specification language
-
Retarget implementation language
-
Extend transformation base
-
This is all super high-level.
-
We won’t cover domain modelling in such high depth in
this module.
-
We’ll focus more on transformation techniques
instead.
C Macros
Macros
-
I’m not going to teach C in these notes.
-
If you don’t know C, read an online tutorial or something.
-
However, I will talk about macros.
-
When a C program is compiled, there is a pre-processing
step that performs text-substitution based on predefined
preprocessor directives/rules, known as macros.
-
There are a number of different directives, like #include and #define.
-
C macros are like a “bare-bones” code
generator.
-
Macros associate names with code fragments:
-
Macros can have parameters:
-
Macros can be layered (macros can use other macros):
-
Scientific computation
-
Embedded programming
Macros in Code Generation
-
So how are C macros like code generation?
-
The preprocessor is like the generator engine.
-
The macro definitions are like the rewrite rules.
-
Macros look and work like functions, but there’s one
huge difference...
-
C macro arguments can be arbitrary code fragments.
-
They can even be types!
|
Macro
|
Usage
|
|
#define SWAP(T,x,y) {T t=x;x=y;y=t;}
|
int lo = 10;
int hi = 20;
SWAP(int,lo,hi);
→ {int t=lo;lo=hi;hi=t;}
|
-
... or even proper statements!
|
Macro
|
Usage
|
|
#define EXECUTE(s) s;
|
int a = 1, b = 2; c;
EXECUTE(c = a + b);
→ c = a + b;
|
Macro Operators
-
Macros have some special operators you might not be aware
of.
-
Here’s three of them:
-
Converts a token to a string literal.
|
Macro
|
Usage
|
|
#define VAR_NAME(x) #x
|
char* varName = VAR_NAME(foo);
→ char* varName = “foo”;
|
-
Converts a token to a character literal.
|
Macro
|
Usage
|
|
#define AS_CHAR(x) #@x
|
char myChar = AS_CHAR(f);
→ char myChar = ‘f’;
|
-
Token-pasting operator (##)
-
Also called the merging or combining operator.
-
It lets you combine tokens together by unwrapping their
values and sticking them together.
-
If the given token is not a parameter, it just uses the
token name.
|
Macro
|
Usage
|
|
#define MAKE_VAR(T,id,val) T var##id = val
#define MAKE_VAR_NAME(T,name,id,val) T name##id = val
|
MAKE_VAR(char,56,10);
→ char var56 = 10;
MAKE_VAR(int,jojo,3,8);
→ int jojo3 = 8;
|
Coding Idioms with Macros
-
Macros can also be used to hide coding idioms in
syntax.
-
You need to find out what can be generalised, and replace
them with macro parameters.
-
A good example are functional programming concepts, like
map or filter (or, if you’re familiar with .NET, Select and
Where).
-
Here’s a ‘foreach’ macro I wrote that
works with arrays:
|
Macro
|
Usage
|
|
#define FOREACH(arr,len,i,st) { \
int i = 0; \
for (i = 0; i < len; i++) { \
st; \
} \
}
|
int arr[10] = { ... };
/* Sets all elements to 0 */
FOREACH(arr,10,i,arr[i] = 0);
→ { int i = 0; for (i = 0; i < 10; i++)
{ arr[i] = arr[i] + 1; } }
|
-
Using the FOREACH macro as a base, you could implement
other macros, such as MAP.
-
So, C macros are cool.
-
It allows you to abstract lower-level implementation by
text substitution.
-
You can even make a simple DSL (domain-specific language) with it.
-
But, there’s one small problem...
-
... it sucks.
-
We’ll explain why it sucks in the next section.
Macro Hygiene
-
Macros that work with text substitution are called syntax macros (or lexical macros).
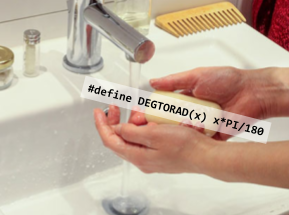
Why Syntax Macros Suck
-
There’s a couple of problems with them:
|
Problem
|
Example + Solution
|
|
Operator priorities can interfere with complex
macro arguments and bodies
|
Example
|
#define DEGTORAD(x) x*PI/180
DEGTORAD(a-b)
→ a-b*3.1415/180
|
It’s going to do
a-(b*3.1415/180)
When really we wanted
(a-b)*3.1415/180
|
|
Solution
Bracket the macro arguments, and add outer
brackets, so calls like 1/DEGTORAD(a) will work as well:
|
#define DEGTORAD(x) ((x)*PI/180)
|
|
|
Macro body can interfere with surrounding
syntax
|
Example
|
#define SWAP(x,y) t=x;x=y;y=t
if (a>b) SWAP(a,b);
→ if (a>b) t=a;a=b;b=t;
|
The part that says
t=x;
( t=a; in the expanded code)
terminates the if statement, so the rest of the
macro, namely
x=y;y=t;
( a=b;b=t; in the expanded code)
will not be included in the if clause.
|
|
Solution
Proper “packaging” of the macro
body:
|
#define SWAP(x,y) {t=x;x=y;y=t}
|
|
|
Side effects in macro arguments can be
duplicated
|
Example
|
#define MIN(x,y) (((x)<(y)) ? (x) :
(y))
int a = 1, b = 2;
int x = MIN(++a, ++b)
→ int x =
(((++a)<(++b)) ? (++a) :
(++b))
|
In the macro expansion, ++a or ++b are executed
twice (depending on what is returned), leading to unwanted values:
a == 3, b == 3, x == 3
|
|
Solution
Use local temporary variables
|
#define MIN(x,y) \
({ typeof (x) _x = (x);
\
typeof (y)
_y = (y); \
_x < _y
? _x : _y; })
|
However, this is not ANSI-C; in other words,
this does not conform to the C standard set by
ANSI and ISO.
|
|
Variable declarations in body can capture
arguments
|
Example
|
#define SWAP(T,x,y) { T t=x;x=y;y=t; }
int t = 0, s = 1;
SWAP(int,t,s);
→ { int t=t;t=s;s=t;
};
|
The code:
int t = t;
t = s;
s = t;
does not swap t and s, because the instance of t outside the block is not changed.
|
|
Solution
Obfuscate local variables
|
#define SWAP(T,x,y) { T _t_SWAP=x;x=y;y=_t_SWAP;
}
|
This isn’t foolproof; it just reduces the
chance of this problem arising.
|
-
Automated Code Generation: where everything sucks; even
code generation.
-
To prevent these problems, we need to clean our macros.
-
In other words, we need to ensure they are hygienic.
Hygienic Macros
-
What does it mean for a macro to be hygienic?
-
There are three categories of hygiene:
-
Guarantees structural integrity of expanded code.
-
Basically, when macros are expanded, the whole code is
still valid syntax.
-
This can be achieved by using trees (ASTs) instead of text.
-
Guarantees referential integrity of expanded code.
-
Basically, all the local variables in the macro do not
affect the variables outside the macro (see the “Variable declarations in body can capture
arguments” example above).
-
This can be achieved by controlled renaming.
-
Guarantees type integrity of expanded code.
-
Basically, the typing of the whole code still holds up
after the macro has been expanded.
-
This is difficult to achieve.
Wash your macros before you use them.
-
To guarantee structural integrity, we use syntax trees.
-
All code can be tokenized into abstract syntax trees
(ASTs).
-
Instead of replacing text, macros should insert
trees.
-
To do this, macros must be syntactically well-structured.
-
It’s no good putting half-written code into
macros.
-
If macro bodies are not well-structured, then we
can’t create ASTs of them.
-
To check if macro bodies are well-structured and create
ASTs of them, our macro processor needs to be language-aware; they need to know what makes good code.
-
This means the macro processor needs to have tight
integration with the compiler, making this type of macro
less general.
-
Despite this, macros don’t have to be a compilation unit.
-
What we mean by this is that macros don’t have to be
‘terminating’; it can trail off with a
non-terminal, as long as the macro code is “finished
off” when it’s used.
-
To guarantee referential integrity, we use renaming.
-
Referential integrity: names refer to the “right” objects.
-
You could obfuscate the local variables in a macro body,
but that’s not a true solution.
-
A better solution would be to bind renaming of introduced
names.
-
What do I mean by that? I’ll show you...
|
Example: Matt’s Teach Yourself Scheme in 3
Minutes
|
-
Let’s create a macro in Scheme.
-
Why?
-
Because they make one in the slides, and
I’m scared that a Scheme question
might come up in the exam (probably not, but covering this puts my
mind at ease).
-
If you wanna check Scheme out, I suggest
you pick up a Scheme compiler (I used racket) and check out this site.
|
(define-syntax push
(syntax-rules ()
((push v s)
(set! s (cons v s)))))
|
-
That’s a lot of brackets. So what
does this do?
-
In layman’s terms, this defines a push macro that takes in a value and a
list, and appends the value to the
list.
-
Here’s how it works in more
detail:
-
The define-syntax keyword creates a macro called push.
-
The syntax-rules block means this macro uses
pattern-matching to find instances of where
this macro is used, before replacing it with
the macro body.
-
The (push v s) part means that if there is a call to push somewhere in our code, like:
-
... we should replace it with this set! call, where “item” is the parameter v and my_list is the parameter s.
-
The set! call sets a value to a variable, and cons is like the list constructor from
Haskell.
-
If you want to know more about this Scheme
syntax, I suggest checking out the site
linked above. It’s quite short.
-
Alright, so what? We have a macro in
Scheme, now what?
-
If we tried to define a list called cons and tried to use that as an argument
to our macro, we’d end up getting two cons’.
|
(define cons (list 1 2 3)) ; defines a list called
'cons' with (1 2 3) in
it
(push 4 cons)
→ (set! cons (cons 4
cons))
|
-
Oof! You see that? “cons 4
cons”. That’s not good.
-
To guarantee referential integrity, we make
these terms refer to the right
objects.
-
For example, when we want to use the
‘cons’ keyword to refer to our
newly created list, it should point to the
list, and not to the keyword for list
construction.
-
One way we can do this is to timestamp
names with nesting levels:
|
(define-syntax push
(syntax-rules ()
((push v s)
(set! s (cons:0 v s)))))
(define cons:1 (list 1 2 3)) ; defines a list called
'cons:1' with (1 2 3) in
it
(push 4 cons:1)
→ (set! cons:1 (cons:0 4 cons:1))
|
-
Boom! Our macro is now super cleanly.
|
C++ Templates
Templates in C++
-
I love stacks.
-
Stacks have given us so many things: stacks of pancakes,
Tower of Hanoi, Pringles, etc.
-
In fact, let’s implement a stack right now. You with
me? Let’s go!
|
class Stack {
std::vector<int> rep;
public:
void push(const int& t);
int pop();
bool is_empty();
};
|
-
Oh... a stack of ints. I wanted a stack of pancakes.
-
But what if I also wanted a stack of pringles, and a stack
of chars, too?
-
We can use C++ templates!
-
C++ templates are parameterized declarations.
-
This means that, by using C++ templates, you can add
parameters to declarations, so when you declare stuff, you
can add arguments to change what you’re declaring
exactly.
-
Let’s add a C++ template to our stack example:
|
template <class T>
class Stack {
std::vector<T> rep;
public:
void push(const T& t);
T pop();
bool is_empty();
};
|
-
By adding the line template <class T> before the class declaration, we are parameterizing stack’s declaration.
-
In this case, T is the parameter. We can use T as a type anywhere we like.
-
Here, we’re using T as the type of the stack’s elements.
-
Now, we can declare any type of stack we like, using
diamond operators to pass in types as T!
|
Stack<int> intStack;
Stack<char> charStack;
Stack<🥞> pancakeStack;
|

With templates, you can make one of these in C++.
-
You may have noticed we used std::vector<T>, even though T is itself a template parameter.
-
We can use template parameters as template arguments,
too.
-
Classes are not the only declarations we can
parameterize.
-
We can also parameterize struct and function
definitions:
|
template <class T>
T min(const T& a, const
T& b) {
if (a < b) return a; else return b;
}
|
-
This function would work for ints, floats, doubles, or anything that supports a < operator.
-
Templates implement parametric polymorphism.
-
That means we can write a function or data that still works
without depending on certain types.
- Templates:
-
make almost no assumptions about the template parameters (except copy constructors, destructors, and equality, which
is common to all classes)
-
is similar to ML / Haskell, in the sense of polymorphic
data types and functions
-
is not similar to Haskell, in the sense that template
parameters have no type-checking
-
Templates are used for generic programming, like
implementing type-agnostic data structures such as lists or
stacks.
Template Parameters
-
So what? Java has generics; you can make stacks of pancakes
in Java too.
-
Yes, but there is a difference between Java generics and
C++ templates.
-
“Java generics suck and C++ templates suck a bit
less”?
-
Now you’re getting it!
-
C++ templates can have different kinds of parameters:
-
This is the most common case, denoted by the class keyword. We used this above.
-
You can also use the typename keyword, but there’s only a few instances where
you should use this, which we’ll see later.
-
You also can’t use local classes as a template
parameter.
-
This means we don’t have to pass in a type; we can
pass in a value instead, like a number.
-
A non-type template parameter can accept one of the
following (source):
-
Integral or enumeration type
-
Pointer to object or pointer to function
-
lvalue reference to object or lvalue reference to
function
-
Pointer to a member
-
std::nullptr_t
-
This only works with class templates.
-
Using this, we could set a size limit on our stack:
|
template <class T, int Max>
class Stack {
...
public:
...
bool is_full() { return size==Max }
};
|
-
Yes, we can even have higher-order templates.
-
Template template parameters let us put templates as
parameters.
-
Let’s use an example:
|
template <template <class T> class TT>
class IntsAndChars {
TT<int> data1;
TT<char> data2;
}
IntsAndChars<Stack>
myData;
|
-
In this example, we create an IntsAndChars class that takes a class template as a parameter, and
creates int and char instances of that class.
-
We pass it the Stack class, and now our IntsAndChars variable is handling a Stack<int> and a Stack<char> internally.
-
We can also have default arguments for our template
parameters:
|
template <class T = int, int Max = 10>
class A { ... }
A<> ← T = int, Max = 10
A<char> ← T = char, Max = 10
A<char,7> ← T = char, Max = 7
|
-
You could use this to simulate variadic templates:
|
struct nil {};
template <class T, class U=nil, class V=nil>
class Tuple { ... };
tuple<int>
tuple<int, char>
tuple<int, char, std::string>
|
Templates are Syntactic Macros
-
C++ templates are like C macros for classes, in the sense
that they both work by editing the source code.
-
When C++ templates are “compiled”, class
templates are instantiated into normal non-parameterized classes based on how
you use them later on:
|
template <class T>
class Stack {
std::vector<T> s;
public:
void push(const T& t);
T pop();
bool is_empty();
};
|
Stack<int>

|
class __Stack_int {
std::vector<int> s;
public:
void push(const int& t);
int pop();
bool is_empty();
};
|
-
After this, instead of using Stack<int>, the code will be using this new __Stack_int class instead.
-
Function templates can be implicitly instantiated.
-
This means we don’t have to specify types; we can let
the compiler derive them.
-
Here’s explicit instantiation:
-
Here’s implicit instantiation:
|
::min(1, 2);
std::string str1("Cat"), str2("Hat");
std::string first = ::min(a, b);
|
-
If the compiler can derive them, the type arguments can be
left out.
-
This isn’t always possible though.
-
::min refers to the member function in the implicit
class.
Why C++ Templates Suck
-
There’s one small problem with this...
-
... it sucks?
-
As with everything, according to Automated Code Generation,
yes... it does have its drawbacks.
-
C++ templates use the instantiation model.
-
This means for every usage of the class template, another
non-parameterized class is generated.
-
So if I used Stack<int>, Stack<char>, and Stack<🥞>, the compiler will generate three versions of the same
stack class, but with different types.
-
Of course, if I used Stack<int> multiple times, it’ll use the same generated
class (you could say it’s cached).
-
This is different from what Java does; they use the skeleton code model.
-
With that, Java uses the same skeleton class for all
usages, but everything is downcast when they are used.
-
This makes things really slow.
-
So, there is a trade-off. The instantiation model is
faster, but is prone to code bloat, especially if you use
lots of class variations.
-
Oh, and not to mention, C++ template syntax is horrible
when you use it like this.
Templates Specialisation in C++
-
You can provide specialised versions of templates, where
you effectively “pattern match” on the template
parameters.
-
Doing this is called template specialisation.
-
You can do this to provide different implementations when
certain parameters of the templates are provided.
-
Here’s an example of some specialised
templates:
|
// Primary template
template <class T, class U, class V>
class t { ... };
// Partial specialisation; T, U, and V are
pointer types
template <class T, class U, class V>
class t<T* U* V*> { ...
};
// Partial specialisation; some parameters are
identical
template <class T, class U>
class t<T, T, U> { ...
};
template <class T, class U>
class t<T, U, U> { ...
};
// Partial specialisation; all parameters are
identical
template <class T>
class t<T, T, T> { ...
};
// Explicit specialisation; all must be
integers
template <>
class t<int, int, int> { ... };
|
-
The compiler picks the most specialised instance.
-
The order of specialised templates is called the template specialisation order.
-
We say that:
-
T1 is more specialised than T2 (T1 ≥ T2)
-
“every template argument list that matches T1 also
matches T2, but not vice versa”
-
T1 is maximally specialised (with respect to a primary template T) iff it matches T and there is no more specialised T2
matching T.
|
Example
To make a template special, you just have to
believe it’s special.
|
|
|
T
|
T1
|
T2
|
|
template <class A, class
B>
class c{ ... };
|
template <>
class c<int, int> { ...
};
|
template <class A>
class c<A, A> { ...
};
|
-
With the above templates, T1 is more
specialised than T2, because:
-
T1’s arguments match T2’s (A
can be set to int)
-
T2’s arguments do not match
T1’s (int cannot be generalised to A)
-
In addition, T1 is maximally specialised
because there are no templates that are more
specialised than T1.
|
-
You could get a compile-time error if:
-
There is no matching instance (using c<char> for the example above)
-
No unique maximally specialised template for instance (don’t understand what that means? Read the next
example!)
|
Example
Gay pride templates
|
|
|
A
|
template <class T, class U,
class V>
class t { ... };
|
|
B
|
template <class T, class U,
class V>
class t<T*, U*, V*> { ...
};
|
|
C
|
template <class T, class
U>
class t<T, T, U> { ...
};
|
|
D
|
template <class T, class
U>
class t<T, U, U> { ...
};
|
|
E
|
template <class T>
class t<T, T, T> { ...
};
|
|
F
|
template <>
class t<int, int, int> {
... };
|
-
Given these templates, which specialisation
is selected?
|
t<int, bool, int>
|
A
|
|
t<int, int, bool>
|
C
|
|
t<int, int, int>
|
F - more specialised than
E
|
|
t<int*, bool*,
int*>
|
B
|
|
t<int*, bool*,
bool*>
|
ERROR: both B and D are maximally
specialised for this template.
We have no idea which one to
pick!
|
|
-
You can specialise on all template parameters, even
non-type (value) ones.
-
So, for example, if a template accepts an int, you could specialise that with a constant, like 2 or
6.
-
It requires compile-time expressions, so you can use static const or enum.
-
You cannot use input from the user, called dynamic input; you must use input that can be calculated at
compile-time, called static input.
-
You can perform conditionals through selection of most
specialised instances.
-
So, we have conditionals, values, a state (through
enums)... what does this all mean?
-
C++ templates are Turing complete!
-
It’s a compile-time programming language and...
-
... yes, you guessed it. It sucks.
-
The slides call it “functional programming with bad
syntax”.
|
Example
Templates!
|
-
To do recursion with templates:
-
Implement the recursive step as the normal
template
-
Implement the base case as a specialised
template
-
We’ll implement factorial as an
example:
|
Recursive step
|
Base case
|
|
template <int N>
struct Factorial {
enum {
RET = N *
Factorial<N -
1>::RET
};
};
|
template <>
struct Factorial<0>
{
enum {
RET = 1
};
};
|
-
Now, if you try and use this template, the
compiler will expand it out like so:
|
Factorial<3>::RET;
|

|
struct Factorial_3 {
enum { RET = 3 *
Factorial_2::RET };
};
struct Factorial_2 {
enum { RET = 2 *
Factorial_1::RET };
};
struct Factorial_1 {
enum { RET = 1 *
Factorial_0::RET };
};
struct Factorial_0 {
enum { RET = 1 };
};
|
-
Your compiler can even optimise away
constant expressions (since those values will never change,
what’s the harm in computing them in
advance and hard-coding them?):
|
Factorial<3>::RET;
|
|
struct Factorial_3 {
enum { RET = 6 };
};
struct Factorial_2 {
enum { RET = 2 };
};
struct Factorial_1 {
enum { RET = 1 };
};
struct Factorial_0 {
enum { RET = 1 };
};
|
|
-
Templates define compile-time functions.
-
Specialisation is like pattern matching.
-
Template expansion is compile-time evaluation.
-
Using ‘enum’ forces the compiler to evaluate
values.
-
Template arguments are also evaluated, so the compiler
knows which template specialisation to use.
-
Compiler optimisations clean up the generated
program.
-
You can even mix-and-match compile-time and run-time
arguments!
|
Normal boring fully-dynamic ‘power’
function
|
Totally epic half-compile-time half-run-time
‘power’ function
|
|
int power(int n, int m) {
if (n == 0) return 1;
else if (n == 1) return m;
else return m * power(n - 1, m);
}
|
template <int n>
int power(int m) {
return power<n - 1>(m) * m;
}
template <> int power<1>(int m) {return m;}
template <> int power<0>(int m) {return 1;}
|
-
The only thing is, if you use the half-compile-time
version, your argument n must be a constant.
-
It cannot be a dynamic value provided by the user with
stdin or something.
-
Partial evaluation: symbolically executes the program P for some given static
inputs and constructs a residual program P’ with the
same behaviour for all dynamic inputs.
-


-
In other words, it takes static inputs and a program P, and
creates a new program P’ where all the given static
inputs are hard-coded.
-
This is analogous to our C++ compiler,
“instantiating” templates (code generating, in a sense) during the compilation process with given static
inputs (constants).
-
Binding time analysis: analyzes a program P to identify parts that can be
evaluated statically (we don’t do this in C++).
-
Staging: annotates a program P to identify parts that can be
evaluated statically.
-
In C++, we do ‘staging’ through templates and
other keywords, such as constexpr.
Template Metaprogramming
-
In C++ templates, we have:
-
Class templates → functions
-
Integers and types → data
-
Symbolic names → variables (enums and typedefs)
-
Lazy evaluation (templates only instantiated if struct is accessed via ::)
-
Let’s make some templates so that it actually looks
like a programming language.
IF<>
-
We already have conditionals with specialisation.
-
But... if statements! Imperative! Functional programming
scary 🥺
-
Fine... let’s implement if statements. It’ll be
syntactic sugar for specialisation.
|
// Normal template is used when Cond =
true
template <bool Cond, class Then, class Else>
struct IF {
typedef Then RET;
};
// Specialised template is used when Cond =
false
template <class Then, class Else>
struct IF<false, Then,
Else> {
typedef Else RET;
};
// Usage:
IF<1 == 0, int, double>::RET f; // f is double
IF<1 == 1, int, double>::RET g; // g is int
|
-
In the same way we use enums to have integer fields, we can use typedef to have pointer fields.
-
We use typedef to point to either Then or Else as our return value RET, depending on whether Cond is true or false.
WHILE<>
-
We already have loops with recursion.
-
But... while loops! Imperative! Functional programming
scary 🥺
-
Alright... let’s implement while loops. It’ll
be syntactic sugar for recursion.
|
template <class State>
struct STOP {
typedef State RET;
};
template <class Cond, class State>
struct WHILE
{
typedef IF<Cond::template Code<State>::RET,
WHILE<Cond, typename State::Next>,
STOP<State>
>::RET::RET
RET
};
|
-
You may wonder about the template Code<State> part.
-
We assume Cond contains a templated class called Code, which has a field called RET that represents our while loop condition.
-
When A contains a templated class member called B, we reference that with A::template B<whatever>.
-
You’ll also notice the strange typename State bit.
-
We use typename when we need to use a class member (extracted from a type) as a template parameter.
-
In this case, we need to use State’s member Next as the second template argument for WHILE.
-
It’s simply for parsing reasons. If you use a C++
IDE, it’ll probably spot that out for you.
-
We also assume State contains a class called Next, which represents the while loop condition in the next
iteration.
|
Example
Fibonacci: the ‘hello world’ of
loops
|
-
Let’s implement Fibonacci
normally:
|
Normal way
|
|
// x == fib(i), y ==
fib(i-1)
int i; int x; int y;
i = 1; x = 1; y = 0;
while (i < n) {
i = i + 1;
x = x + y; // fib(i+1) =
fib(i)+fib(i-1)
y = x;
}
|
-
We need to identify three things to
“convert” this to
WHILE<>:
-
State: the variables that are updated by the
loop
-
The predicate in the while loop; namely, i < n
-
Next: the new state after one iteration
-
i = i + 1, x = x + y, y = x
|
Template way
|
|
template <int n>
struct Fibonacci {
enum {
RET =
WHILE<FibCond<n>,
FibState<1,1,0>
>::RET::x
};
};
template <int i_, int x_, int y>
struct FibState {
enum { i = i_, x = x_ };
typedef FibState<i+1, x+y, x> Next;
};
template <int n>
struct FibCond {
template <class State>
struct Code {
enum {
RET = State::i < n
};
};
};
|
|
Loop Unrolling
-
Have a look at this runtime-only, regular C++ code with no
templates:
|
inline void addVect(int size, double *c, double *a, double *b) {
while (size--)
*c++ = *a++ + *b++;
}
|
-
It adds vectors a and b and puts it into c.
-
According to Automated Code Generation, it sucks.
-
If we used C++ templates instead, it’d still suck,
but it’d suck a little less.
-
How would we convert this to templates?
-
First off, let’s unpack this loop. What’s it
actually doing?
-
Something along the lines of this:
|
*c = *a + *b;
*(c + 1) = *(a + 1) + *(b + 1);
*(c + 2) = *(a + 2) + *(b + 2);
...
*(c + n) = *(a + n) + *(b + n);
|
-
Well, a pretty simple way of doing this with templates
would be:
|
Approach #1
|
|
template <int n>
inline void addVect(double *c, double *a, double *b) {
*c = *a + *b;
addVect<n - 1>(c + 1, a + 1, b + 1);
}
template<>
inline void addVect<0>(double *c, double *a, double *b) {
}
|
-
That works!
-
This generates a version of addVect from 0 to n.
-
But what if n was suuuuuper big?
-
Like, n = 1000 big?
-
We’d be repeating the same *(c + ?) = *(a + ?) + *(b + ?) code 1000 times. That’s bloat!
-
Let’s try things a different way.
-
Here’s an alternate approach:
|
Approach #2
|
|
template <int n, class B>
struct UNROLL
{
static void iteration(int i)
{
B::body(i);
UNROLL<n - 1, B>::iteration(i + 1);
}
};
template <class B>
struct UNROLL<0, B>
{
static void iteration(int i) {}
};
template <int n, class B>
struct FOR
{
static void loop(int m)
{
for (int i = 0; i < m / n; i++)
{
UNROLL<n, B>::iteration(i * n);
}
for (int i = 0; i < m % n; i++)
{
B::body(n * m / n + i);
}
}
};
// USAGE
double *a, *b, *c;
class AddVecBody
{
public:
static inline void body(int i)
{
*(c + i) = *(a + i) +
*(b + i);
}
};
FOR<4, AddVecBody>::loop(1000);
|
-
Alright... what on Earth 🌍 is going on here?
-
This FOR template breaks up the loop into chunks.
-
Each chunk is of size n, so only n + 1 instantiations of the template have to be made (including the 0 specialisation).
-
For example, in the usage case here, we’re adding two
1000-element vectors in chunks of 4.
-
The UNROLL template executes a piece of ‘body’
code a specified number of times with incrementing iteration
values (e.g. given UNROLL<3, B>::iteration(7), then
B::body(7), B::body(8) and B::body(9) would be called).
-
Because each chunk is size 4, only:
-
UNROLL<4, ...>
-
UNROLL<3, ...>
- ...
-
UNROLL<0, ...>
-
... need to be instantiated.
-
Every 4th element of the vector marks the start of a new
unpack:
-
UNROLL<4, B>::iteration(0) (body(0), body(1), body(2), body(3))
-
UNROLL<4, B>::iteration(4) (body(4), body(5), body(6), body(7))
-
UNROLL<4, B>::iteration(8) (body(8), body(9), body(10), body(11))
- ...
-
UNROLL<4, B>::iteration(996) (body(996), body(997), body(998), body(999))
-
This way, all ‘body’ calls from 0 to 999 are
called, and we don’t need to create 1000 versions of
UNROLL to do it!

On the topic of rolling, here is sushi being rolled.
ADTs
-
Constructor functions → class templates
-
Implemented methods → class templates
-
Values → enums
-
Pointers → typedefs
-
Copy constructor arguments → local fields
-
Let’s think of a really simple ADT: a linked
list!
-
You know, a list data structure that works through pointers
pointing to the next element of the list:
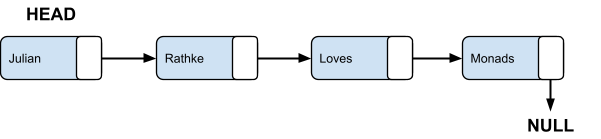
-
How would we implement this through templates?
-
Firstly, we implement our constructor function Cons. It stores our value and a pointer to the next
element.
-
There we go; right from that description, we’ve
identified a few things we could do:
-
Implement constructor function Cons as a class
template
-
Implement stored value as an enum
-
Implement pointer to next element as a typedef
-
Remember to implement a special “Nil”
structure, so our Cons template can point to some
“null” value at the end of the list.
|
Normal code
|
Template code
|
|
struct Cons {
int head;
Cons *tail;
}
|
struct Nil {
enum { head = ERROR };
typedef Nil Tail;
};
template <int head_, class Tail_ = Nil>
struct Cons {
enum { head = head_ };
typedef Tail_ Tail;
}
|
-
There we go! We can now create linked lists:
-
Cons<1, Cons<2, Cons<3, Nil>>> (1 → 2 → 3 → NULL)
-
But what use is a data structure if we can’t do
anything with it?
-
There are loads of functions over lists, but we’ll
implement a simple “length” function for
now.
-
According to our main ideas above, we should implement this
as a class template as well.
|
Normal code
|
Template code
|
|
int Length(Cons *l) {
if (l->tail == NULL)
return 1;
else
return Length(l->tail) + 1;
}
|
template <class List>
struct Length {
enum { RET =
Length<typename List::Tail>::RET + 1
};
};
template <>
struct Length<Nil> {
enum { RET = 0 };
};
|
-
Now we can find the length of a list:
-
Length<Cons<1, Cons<2, Cons<3,
Nil>>> (result = 3)
-
Let’s do one more: the “append”
function.
-
We should also implement this as a class template as
well.
|
Normal code
|
Template code
|
|
void Append(Cons *list1, Cons *list2) {
if (list1->tail == NULL)
list1->tail = list2;
else
Append(list1->tail, list2);
}
|
template <class L1, class L2>
struct Append {
typedef Cons<L1::head,
typename Append<typename L1::Tail,
L2
>::RET
> RET;
};
template <class L2>
struct Append<Nil, L2>
{
typedef L2 RET;
};
|
-
Now we can append elements to the end of a list:
-
Append<Cons<1, Cons<2, Nil>>, Cons<3, Nil>> (result = 1 → 2 → 3 → NULL)
Expression Templates
-
We can use templates to implement domain-specific
languages.
-
We can do this by:
-
representing ASTs with expression templates.
-
implement AST transformations as class templates.
-
link ASTs to semantics (C++) with an eval method (we use inline for code generation)
-
provide syntactic sugar with overloaded operators
-
Let’s have an example: what domain-specific language
should we implement?
-
How about vector addition? That’s simple
enough.
-
It’s also on the slides, so I don’t have much
of a choice.
-
We want to implement this concise syntax:
-
Vector v, a, b, c;
-
v = a + b + c;
-
We’d like to generate it into this:
-
for (uint i = 0; i < v.size(); i++)
-
v[i] = a[i] + b[i] + c[i];
-
No temporary variables, and only a single pass through
memory.
-
Why is this section called expression templates?
-
What are expression templates?
-
Expression templates encode ASTs using static types.
-
Templates construct compile-time expression representation,
and fields are run-time values.
-
In other words, if we had something like ((a + b) + c),
that expression structure would be encoded compile-time, but
the actual values of a, b, and c are run-time values, so
they don’t have to be constant (they could be provided by the user).
-
NOTE: I got really stuck trying to implement this myself. If
you’ve got it working, please hmu with a pastebin or
something so I can add it here pls ty 🙏
-
You can implement domain-specific languages; really good
abstraction
-
Clumsy template syntax
-
Limited applicability (you can only really do this with algebraic
libraries)
-
Testing is difficult
Aspect Oriented Programming with AspectJ
Aspect Oriented Programming Concepts
-
Macros and aspects are code-based transformations.
-
They change the underlying code before it’s compiled
and run.
-
Macros use explicit invocation (you invoke the macro where it is to be run).
-
Aspects use implicit invocation (you tell the aspect where it must perform).
-
Concern: specific requirement or consideration that must be
addressed in order to satisfy the overall system goal.
-
Functionality
-
Efficiency
-
Reliability
-
User interface
-
In other words, a concern is something you want to
implement in your project.
-
It could be many things:
-
Logging
-
Error handling
-
Security
-
Actual business logic
-
To illustrate this, let’s say we had a function that
adds a new ‘User’ record with SQL:
|
addUserRecord(user_record) {
if (user_record.age < 0) {
println("Failed to add user; invalid
age");
throw new InvalidFieldException("Please
input a valid age!");
}
if (sql_in(user_record.name) ||
sql_in(user_record.age)) {
println("Failed to add user; SQL injection
detected");
throw new SQLInjectionException("SQL
injection detected!");
}
var sql = "INSERT INTO User (name, age)
VALUES ($user_record.name,
$user_record.age)";
println("Adding new user...");
var success = execute_sql(sql);
if (success)
println("Added new user
successfully!");
else {
println(“Failed to create new user;
rolling back”);
rollback();
}
}
|
-
Eugh... there’s colours all over. The concerns are
all coupled with each other!
-
These are called cross-cutting concerns: implementation that spans across multiple code
units.
-
As a wise man once said...
-
We should separate our concerns so they’re not
coupled together.
-
Wouldn’t it be nice if we could do this...?
|
error_handling {
before addUserRecord(user_record)
{
if (user_record.age < 0)
throw new
InvalidFieldException(“Please input a
valid age!”);
}
after addUserRecord(success) {
if (!success)
rollback();
}
}
|
|
security {
before addUserRecord(user_record)
{
if (sql_in(user_record.name) ||
sql_in(user_record.age))
throw new
SQLInjectionException(“SQL injection
detected!”);
}
}
|
|
logging {
before execute_sql {
println(“Adding new
user...”);
}
after addUserRecord(success) {
if (success)
println(“Added new
user successfully!”);
}
before rollback() {
println(“Failed to create
new user; rolling back”);
}
after addUserRecord throwing
InvalidFieldException {
println(“Failed to add
user; invalid age”);
}
after addUserRecord throwing
SQLInjectionException {
println(“Failed to add
user; SQL injection detected”);
}
}
|
|
addUserRecord(user_record) {
var sql = "INSERT INTO User (name, age)
VALUES ($user_record.name,
$user_record.age)";
var success = execute_sql(sql);
return success;
}
|
-
Woo hoo! Our concerns are now grouped together, all
nicely.
-
So, what’s going on here?
-
Those coloured blocks are our aspects. They contain code (also called advice) to inject, and where to inject it.
-
We tell the aspects where to inject the code using pointcut descriptors, which describe join points.
-
For example, in the first code block in the logging aspect,
the pointcut descriptor “before execute_sql”
describes a single join point: just before the
‘execute_sql’ function is called (this isn’t real AspectJ mind you; just aspect
pseudo-code).
-
A small piece of code to log the message “Adding new
user...” is injected just before calls to
‘execute_sql’.
-
Here are some definitions:
-
Join point: a point in the program execution where a cross-cutting
concern might intervene.
-
Join point models:
-
Static: join points described by code patterns
-
Dynamic: join points described by control flow
-
Event-based: when condition C arises, perform action A
-
Pointcut descriptors: syntactic constructs that describe a set of join
points.
-
Advice: code that belongs to cross-cutting concerns
-
Aspect: packs pointcuts and advice into a syntactic unit
-
There are loads more, like:
-
Different ways to describe join points
-
Capturing arguments and return values
-
Aspect state
-
Declaring stuff within classes that already exist
-
Want to know more?
-
Or are you completely confused?
-
Or do you just want to get on with your ACG revision
already?
-
Then read on...
Introduction to AspectJ
-
Create an aspect like this:
|
public aspect MyAspect {
// aspect code
}
|
-
In an aspect, you have pointcuts (setter()) which describe join points (calls to methods that start with ‘set’ and
return nothing):
|
public aspect MyAspect {
pointcut setter(): call(void set*(*));
}
|
-
You can use these pointcuts to inject advice code (println calls) in a specific position using advice specs (before, after, around etc.):
|
public aspect MyAspect {
pointcut setter(): call(void set*(*));
before(): setter() {
System.out.println("I am before the setter call!");
}
after(): setter() {
System.out.println("I am after the setter call!");
}
around(): setter() {
System.out.println("I am here instead of the setter
call!");
}
// can also substitute pointcut directly
before(): call(void set*(*)) {
System.out.println("I am before the setter!");
}
}
|
-
You can have local mutable state in aspects:
|
public aspect MyAspect {
int count = 0;
pointcut setter(): call(void set*(*));
before(): setter() {
count++;
System.out.println("You have setted " + count + " times so far.");
}
}
|
-
You can describe many different Java concepts:
|
Pattern type
|
Syntax
|
Examples
|
|
MethodPattern
|
return_type classpath.method(params)
|
int Adder.add(int[])
public static void main(*)
|
|
FieldPattern
|
type class.field
|
static int T.x
private final int MAX_NUMS
|
|
ConstructorPattern
|
classpath.new(params)
|
org.main.Dog.new()
MyString.new(char[])
|
|
TypePattern
|
type
|
int
char
Object
NullPointerException
|
-
Patterns support wildcards:
-
Plain (*): matches Java syntax elements in the same context
-
public * *(int) → public return_type name(int param1)
-
* * *(*, *) → accessibility return_type name(type1 param1, type2 param2)
-
Lexical (*): matches names as in regular expressions
-
* *set*(int) → return_type anysetany(int param1)
-
* *.set*(int) → return_type class.setany(int param1)
-
List ellipsis (..): matches arbitrary parameter / package / class name
lists
-
* *(int, ..) → return_type name(int param1, ...)
-
* swing..*(..) → return_type swing. ... .name(...)
-
Sub-type (+): matches sub-types of given base type
-
Figure+.new() → Figure constructor, ChildFigure constructor etc.
-
There are many kinds of pointcuts:
|
Pointcut type
|
Syntax
|
Description
|
|
Method execution
|
execution(MethodPattern)
|
Captures method execution in its class.
|
|
Method call
|
call(MethodPattern)
|
Captures method calls from its parent
scope.
|
|
Constructor execution
|
execution(ConstructorPattern)
|
Captures constructor execution in its own
class.
|
|
Constructor call
|
call(ConstructorPattern)
|
Captures constructor calls from its parent
scope.
|
|
Object pre-initialisation
|
preinitialization(ConstructorPattern)
|
Captures the moment just before an object is
initialised. Can only be used with constructors.
|
|
Object initialisation
|
initialization(ConstructorPattern)
|
Captures the moment an object is initialised. Can only be used with constructors.
|
|
Static initialisation
|
staticinitialization(ConstructorPattern)
|
Captures the moment a static object is
initialised.
|
|
Field set
|
set(FieldPattern)
|
Captures property mutation.
|
|
Field get
|
get(FieldPattern)
|
Captures property access.
|
|
Handler execution
|
handler(TypePattern)
|
Captures execution of exception handlers.
|
|
Advice execution
|
adviceexecution()
|
Captures execution of advice.
|
Call vs Execution
-
By using call and execution, you can inject code when methods are run.
-
The difference is this:
-
call will refer to the call site (where the method is called: the parent scope)
-
execution will refer to the declaration site (where the method is declared: the belonging class)
|
class Main {
void main() {
var v = new MyValue();
v.getValue(); // ← call(MyValue.getValue())
}
}
class MyValue {
public int getValue() { // ← execution(MyValue.getValue())
return 2;
}
}
|
-
On their own, they don’t make a lot of difference,
but combined with other pointcuts (such as this / target), behaviour is different.
State-Based Pointcuts
-
You can capture the current / target object with this / target:
-
this: the object you are in
-
target: the object you are invoking / referencing (source)
|
class Main {
void main() {
var v = new MyValue();
v.getValue(); // ← call(MyValue.getValue())
}
}
class MyValue {
public int getValue() { // ← execution(MyValue.getValue())
return 2;
}
}
|
|
call
target → instance of MyValue
this → instance of Main
|
execution
target → instance of MyValue
this → instance of MyValue
|
-
Call and execution won’t affect ‘target’,
because the method is the same regardless.
-
However, ‘this’ changes between call and
execution, because:
-
‘this’ via ‘call’ refers to the
parent scope
-
‘this’ via ‘execution’ refers to
the object that the method belongs to
-
You can use them like this:
|
public aspect MyAspect {
// Only using target / this as a
'guard' using a TypePattern
before(): call(* *.getValue()) &&
target(MyValue+) { ... }
// Capturing target / this in a parameter
before(MyValue mv): call(* *.getValue())
&& target(mv) { ... }
before(Main main): call(* *.getValue())
&& this(main) { ... }
before(MyValue mv): execution(*
*.getValue()) && target(mv) { ... }
before(MyValue mv): execution(*
*.getValue()) && this(mv) { ... }
}
|
-
If you’re capturing the main method, you
shouldn’t use ‘call’, because nothing is
calling main, therefore ‘this’ won’t make
sense.
-
You can also capture arguments using args:
|
class Main {
void main() {
MyValue.setValue(2);
}
}
class MyValue {
public static void setValue(int val) { ... }
}
public aspect MyAspect {
// You can also use ‘args’ as a
guard using a TypePattern
before(): call(* *.setValue(*))
&& args(int) { ... }
// ... or capture arguments in a
parameter
before(int arg): call(* *.setValue(*)) &&
args(arg) {
// arg == 2
}
}
|
-
You can get the return value using after and returning:
|
public aspect MyAspect {
after() returning(int i): call(int *.getInt()) {
System.out.println("Returned value:" + i);
}
}
|
Class JoinPoint
-
You can capture join points within a specified scope using within and withincode.
-
within uses a TypePattern (classes)
-
withincode uses a MethodPattern (methods and constructors)
|
class Main {
void main() {
MyValue.setValue(2);
}
}
class MyValue {
public static void setValue(int val) { ... }
}
public aspect MyAspect {
// Captures call to setValue within a class
that’s not in standard Java library
before(): call(* *.setValue(*)) &&
!within(java..*) { ... }
// Captures call to setValue within the main
method in Main
before(): call(* *.setValue(*)) &&
withincode(* Main.main()) { ... }
}
|
-
You can get pointcut properties using thisJoinPoint.
-
You can use if statements in pointcuts (but they should have no side-effects):
|
public aspect MyAspect {
// Captures call to method when array passed in
has more than 2 elements
before(int[] arr): call(* *.method(*))
&& args(arr) && if(arr.length
> 2) { ... }
}
|
Advice Placement
-
You can replace join point code with around. Just be sure to include the return type of the method
before the around keyword:
|
public aspect MyAspect {
Object around(): call(* *(..)) {
// ...
Object result = proceed(); // ← invokes original join point
code
return result;
}
}
|
-
You can capture method definitions that throw exceptions,
and aspects can throw exceptions too:
|
public aspect FailureHandling {
final int N = 3;
pointcut getReplyMethod(): call(int *.getReply() throws RemoteException)
int around() throws RemoteException: getReplyMethod() {
int retry = 0;
while (true) {
try {
return proceed();
}
catch (RemoteException ex) {
System.out.println("Encountered " + ex);
retry++;
if (retry == N) throw ex;
System.out.println("Retrying...");
}
}
}
|
CFlow
-
You can capture join points based on its current control
flow with cflow and cflowbelow:
|
public class Main {
void main() {
FIB(3);
}
void FIB(int n) { // Just your average recursive fibonacci
implementation
if (n == 0) return 0;
return FIB(n - 1) + n;
}
}
public aspect MyAspect {
pointcut fib(): call(void FIB(int))
pointcut p1(): fib() && cflow(fib()) // ← Captures FIB(3), FIB(2), FIB(1) and
FIB(0)
pointcut p2(): fib() && cflowbelow(fib()) // ← Captures FIB(2), FIB(1) and
FIB(0)
pointcut p3(): fib() && !cflow(fib()) // ← Captures nothing
pointcut p4(): fib() && !cflowbelow(fib()) // ← Captures only top-level FIB(3)
}
|
|
FIB(3)
|
|
|
cflow
|
FIB(3)
|
|
cflowbelow
|
FIB(3)
|
|
FIB(2)
|
FIB(2)
|
|
FIB(1)
|
FIB(1)
|
|
FIB(0)
|
FIB(0)
|
|
!cflow
|
FIB(3)
|
|
!cflowbelow
|
FIB(3)
|
|
FIB(2)
|
FIB(2)
|
|
FIB(1)
|
FIB(1)
|
|
FIB(0)
|
FIB(0)
|
|
Inter-Type Declarations
-
You can declare properties and methods in other
classes:
|
public aspect MyAspect {
private String Line.label = ""; // ← String label is now in Line
class
public void Line.setLabel(String s) { // ← setLabel is now in Line class
label = s;
}
public String Line.getLabel() { // ← getLabel is now in Line class
return label;
}
}
|
-
see aspect methods
-
cannot see aspect fields
-
can only see public interfaces of target class
-
Privileged aspects can see private / protected. Make them
privileged by adding the privileged keyword:
|
class Line {
protected String protecc;
private String privatesOohLaLa;
}
public privileged aspect MyAspect {
public String Line.letMeSeeYourPrivates() { // ← can see Line's privates
String iCanSeeThis = protecc;
return privatesOohLaLa;
}
}
|
-
Aspects can create marker interfaces, populate them, and add new inheritance links (make other classes inherit them):
|
public class Dog {}
public aspect Barking {
public interface Barker {} // Marker interface 'Barker'
public void Barker.bark() { // Populating marker interface with
'bark' method
System.out.println("Woof!");
}
declare parents : Dog extends Barker; // Dog now inherits Barker
// Pointcut that captures Dog constructor and
binds created Dog instance
pointcut dogConstructor(Dog dog) : initialization(Dog.new()) && target(dog);
after(Dog dog) : dogConstructor(dog) {
dog.bark(); // Can now use 'bark' method in any
Dog
}
}
|
-
You can do compile-time static checks to make sure certain
join points are not captured:
|
public aspect MyAspect {
pointcut illegalNew():
call (FigureElement+.new(..)) && // Calling constructor
!withincode(* FigureElementFactory.mk*(..)); // Not in a factory method
declare error: illegalNew() : // Static check
"Use factory method";
}
|
-
You must use a static pointcut to do this though (in other words, don’t use args, this, target, if, cflow, or cflowbelow).
Why AspectJ Sucks
-
No way... AspectJ sucks too?!
-
Alas, everything sucks according to Automated Code
Generation.
-
Why does AspectJ suck?
-
According to Meta-AspectJ’s homepage, you can’t provide support for characteristics not
evident in names (for example, you can’t write an aspect for all
classes that do not implement a particular interface).
-
In other words, AspectJ simply isn’t powerful and
expressive enough for certain use cases.
-
Just before you delete all your coursework, let me show you
how you can make AspectJ not suck.
-
You use Meta-AspectJ!
Quote-Based Metaprogramming
-
Before we dive into Meta-AspectJ, let’s go over
metaprogramming.
-
A meta-program is a program that represents and manipulates programs as
data objects at its run-time.
-
A few examples are:
-
Parser, compiler
-
Profiler, partial evaluator
-
Code generator
-
A meta-programming language provides language support to represent programs as
data objects (reflection).
-
A few examples of that are:
-
Java with its Reflection API
-
Prolog with clause/3, assert/1, retract/1
-
But how should we represent these programs in our
code?
-
Oof, no... it holds no information about the grammar, and
would be a pain to navigate through.
-
Getting better, but clumsy.
-
It’s usually based on compiler AST exposed by
reflection
-
Built using constructors
-
ASTs with quote and unquote?
|
#1: Let the compiler build the AST
|
#2: Splice meta-level values into AST
|
|
VarDec = `[ int i; ];
Object language (AspectJ)
Glue language (Meta-AspectJ)
Meta language (Meta-AspectJ)
|
VarDec = `[ int i; ];
Class cl = Foo.class;
ClassDec c = `[
class #[cl.getName()] {
#v
}
];
|
-
For some strange reason, the splicing keyword
‘#’ is called ‘unquote’. Unintuitive, but now you know.
-
This is what Meta-AspectJ is all about!
-
Meta-AspectJ: a language tool for generating Java and AspectJ programs
using code templates.
-
Yep; aspects generated Java code, and now we’re
generating aspects....
-
... and before you ask, the next section isn’t about
generating Meta-AspectJ code.
-
Worry not, because the syntax for Meta-AspectJ is
surprisingly simple!
-
All you need to remember are these few points and some Java
reflection and you’ll be fine.
-
These subsections come straight from the Meta-AspectJ tutorial, so check it out if you’re interested.
Entry Points
-
In Meta-AspectJ, there is a fixed set of entry
points.
-
Entry points are non-terminals in the AspectJ grammar, that may be
quoted or unquoted.
-
Basically, when you quote some AspectJ code, that quote
will return a certain AspectJ type.
-
The different types that quotes may return are the entry
points, and the type of a quote depends on what you’re
quoting.
-
Here’s a copy of the table from the Meta-AspectJ
tutorial:
|
Entry Point
|
AST Class
(all paths prefixed by org.aspectj.compiler)
class
interface
|
Example
|
|
Single Identifier
|
base.ast.IDENT
|
IDENT foo = `[ MyClass ];
|
|
Identifier
|
base.ast.Identifier
|
Identifier foo = `[ java.util.Vector ];
|
|
Identifier Pattern
|
crosscuts.ast.NamePattern
|
NamePattern foo = `[ * ];
NamePattern bar = `[ java.lang.* ];
|
|
Modifiers
|
base.ast.Modifiers
|
Modifiers foo = `[ public static ];
|
|
Import
|
base.ast.Import
|
Import foo = `[ import java.lang.*;
];
|
|
Type Spec.
|
base.ast.TypeD
|
TypeD foo = `[ MyClass ];
TypeD builtIn = `[ int ];
|
|
Formal Declaration
|
base.ast.FormalDec
|
FormalDec foo = `[ int x ];
|
|
Variable Declaration
|
base.ast.VarDec
|
VarDec foo = `[int x = 0; ];
VarDec bar = `[ Object x, y; ];
|
|
Expression
|
base.ast.JavaExpr
|
JavaExpr myInt = `[ 32 ];
JavaExpr myBool = `[ true && myInt ==
32 ];
JavaExpr myMethCall = `[ a.foo(3, 5); ];
|
|
Statement
|
base.ast.Stmt
|
Stmt myIncr = `[ x++; ];
Stmt myFor = `[
for (int x = 0; x < 5; x++) {
foo(x);
} ];
Stmt myEmpty = `[ {} ];
|
|
Method Declaration
|
base.ast.MethodDec
|
MethodDec meth1 = `[
public void getY() {
return y;
} ];
|
|
Constructor Declaration
|
base.ast.ConstructorDec
|
ConstructorDec myCons = `[
public Foo() {}
];
|
|
Class Declaration
|
base.ast.ClassDec
|
ClassDec classFoo = `[
public class Foo {
public static final int x =
0;
} ];
|
|
Interface Declaration
|
base.ast.InterfaceDec
|
InterfaceDec myInterface = `[
public interface myInterface {
public void foo();
} ];
|
|
Compilation Unit Member (Java)
|
base.ast.ClassMember
|
Any Class Declaration or Interface
Declaration
|
|
Compilation Unit Member (AspectJ)
|
base.ast.AspectMember
|
Any Class Declaration, Interface Declaration,
or Aspect Declaration
|
|
Compilation Unit
|
base.ast.CompUnit
|
CompUnit myCompUnit = `[
import java.lang.*;
import java.util.*;
public class Foo {
private int m_iX = 0;
public Foo() {
}
}];
|
|
Intertype Declare
|
crosscuts.ast.DeclareDec
|
DeclareDec d1 = `[
declare parents : myClass implements
java.io.Serializable
];
|
|
Advice Declaration
|
crosscuts.ast.AdviceDec
|
AdviceDec myAdv = `[
before(): call(void set*(*)) {}
];
|
|
Pointcut
|
crosscuts.ast.Pcd
|
Pcd pcd1 = `[
call(void Foo.m(int, int, ...))
];
Pcd pcd2 = `[
execution(Foo.new(int))
];
|
|
Pointcut Declaration
|
crosscuts.ast.PointcutDec
|
PointcutDec pdec = `[
private pointcut foo(Object o);
];
|
|
Aspect Declaration
|
crosscuts.ast.AspectDec
|
AspectDec myAspect = `[
public aspect Foo {
declare precedence: Security,
Logging;
before(): call(void set*(*))
{}
} ];
|
Using ` and #
-
You’ve already seen this, but we use this
syntax:
`[ AspectJ code here ]
-
... to quote some code and put it into a variable.
-
You can also interpolate quoted code into other quotes,
called splicing:
|
Identifier myIdent = `[ foo ];
VarDec
myVar = `[ int #myIndent = 0; ]; // int foo = 0;
|
-
Make sure you’re constructing valid Java code,
because it’ll know!
-
You can splice quoted code, or regular variables (as long as it makes sense).
-
There’s two ways to splice:
|
#id
|
#[expression]
|
|
Identifier name = `[ foo ];
int val = 2;
VarDec dec = `[ int #name = #val; ];
// int foo = 2;
|
int baseVal = 6;
VarDec dec = `[
int foo = #[baseVal + 10];
];
// int foo = 16;
|
-
You can explicitly set the type of the quote using rounded
brackets just after the ` in the quote, or # in the
splice:
|
Dcl v = `(Dcl)[ int x = 0; ];
Stm s = `(Stm)[ if (#(Dcl)v) x++; ]; // bad
Dcl c = `(Dcl)[ class C { #(Dcl)v } ]; // OK
|
Using infer
-
Instead of looking up the types of the quotes all the time,
you can use the infer keyword to ‘infer’ the type of the
quote:
|
infer type = `[ int ];
infer name = `[ foo ];
infer value = `[ 2
];
infer myVar = `[ #type #name = #value ]; // int foo = 2;
|
-
It’s like Java’s var, but before var was created.
-
One thing about infer is that you must initialise the
variable right away:
|
infer type;
// Boo! 👎
infer name = `[ foo ]; // Yay! 👍
|
Unquote Splice
-
What if you have some repetition that you want to quote,
like parameters, or a long list of methods?
-
You can unquote splice, which is a special kind of splicing where you can splice
in an array of elements into quoted code.
-
Here’s two examples:
|
Parameters
|
Class methods
|
|
FormalDec[] args = new FormalDec[5];
// Creates arguments
for (int i = 0; i < 5; i++)
args[i] = `[ int p#i ];
// Creates function from arguments
infer func = `[ int func(#args) { } ];
/* Output:
int func(int p0, int p1, int p2, int p3, int
p4) { }
*/
|
String[] strings = new String[] {
"Julian",
"Rathke",
"Loves",
"Monads"
};
MethodDec[] methods = new MethodDec[strings.length];
// Creates methods from strings
for (int i = 0; i < strings.length; i++)
{
String string = strings[i];
infer method = `[
public void #string() {}
];
methods[i] = method;
}
// Creates class
infer myClass = `[
public class MyClass {
#[methods.toArray();]
}];
/* Output:
public class MyClass {
public void Julian() {
}
public void Rathke() {
}
public void Loves() {
}
public void Monads() {
}
}
*/
|
Convenience Methods
-
In this section, we’ll go over some useful tidbits in
Meta-AspectJ you might find yourself doing down the
line.
-
The first is pretty simple: the unparse method.
-
It’s in ASTObject, which means it’s in every
quote object, and it converts the quoted code to a
string.
-
It’s useful for printing out quoted code, either for
debugging or writing to a file:
|
infer var = `[ int x = 1; ];
var.unparse(); // “int x = 1;”
|
-
Now, this is where the tutorial ends, but I’m going
to drop in some useful Meta-AspectJ and reflection
tidbits.
-
This is how to add methods to a quoted class:
|
infer myClass = `[ class MyClass {} ];
infer myMethod = `[ public void addOne(int x) { return x + 1; } ];
// ClassDec has an addMethod method
myClass.addMethod(myMethod);
|
-
To add methods and fields to existing classes, use inter-type declarations in aspects:
|
public void addMethod(String className, String methodName) {
infer declaration = `[ public void #className.#methodName() {} ];
infer aspect = `[ public aspect #[className + methodName] {
#declaration } ];
System.out.println(aspect.unparse());
}
public void addField(String className, String fieldName) {
infer declaration = `[ public int #className.#fieldName ];
infer aspect = `[ public aspect #[className + fieldName] {
#declaration } ];
System.out.println(aspect.unparse());
}
|
-
To get a Class by name, use the Class.forName method:
|
public class MyClass extends MyOtherClass {
int x, y;
public MyClass() { ... }
public MyClass(int x) { ... }
public int getX() { ... }
public int getY() { ... }
}
Class myClass =
Class.forName("MyClass");
|
-
Once you have a Class, you can fetch virtually anything
about a class:
|
myClass.getName() // Returns the class name:
'MyClass'
myClass.isInterface() // Checks if it is an interface:
'false'
myClass.isArray() // Checks if it is an array:
'false'
myClass.isPrimitive() // Checks if it is primitive:
'false'
myClass.getSuperclass() // Returns superclass reference:
MyOtherClass
myClass.getDeclaredFields() // Fields: [int x, int y]
myClass.getDeclaredMethods() // Methods: [int getX(), int getY()]
myClass.getDeclaredConstructors() // Constructors: [MyClass, MyClass(int
x)]
myClass.getDeclaredMethod("getX", new Class[0]) // Returns specified method
|
Why Meta-AspectJ Sucks
-
Wha... Meta-AspectJ ALSO sucks?!
- Indeed:
-
Everything sucks
-
Meta-AspectJ is a part of ‘everything’
-
Therefore, Meta-AspectJ sucks
-
What’s the reason this time?
-
For one thing, it’s Java only.
-
Secondly, it’s so meta that you’d probably end
up tangling yourself if you were to use this in a big
project.
-
Let’s be honest: do you really see yourself using
this anytime soon?
-
Thirdly, it’s quite obscure.
-
Have you tried looking up questions about
Meta-AspectJ?
-
Fourthly, I want to keep the pattern going for my own
amusement.
-
Alright, well, we can kind of solve the first one.
-
In Meta-AspectJ, we were working with Java ASTs.
-
What if we had a different tool, but we could work with any
language ASTs in a variety of other target languages?
-
Interested?
-
Allow me to up the ante and say that, with this new tool,
we can work with ASTs in any conceivable language?
-
Alright, that’s dramatising it a bit. Just read the
next section. 🙂
Transformative Code Generation

If you remember (or even did) Programming Language
Concepts,
ANTLR won’t be so hard.
Let’s Get Meta!
-
To implement a language, you need an interpreter: an application that computes or “executes”
sentences.
-
Also, we’d use a translator for converting sentences from one language to another.
-
Programs recognise languages using parsers (or syntax analysers): programs that recognise languages.
-
They do this using a grammar: set of rules to express a language.
-
They first perform lexical analysis and break the source code into a parse tree / syntax tree / abstract syntax tree.
-
The leaves of the tree are always input tokens.
|
Matt’s Teach Yourself ANTLR in 2
minutes
|
-
ANTLR is similar to Backus-Naur form back
in PLC.
-
An ANTLR grammar starts with:
-
A ‘grammar’ line to define the
name of the grammar
-
A ‘prog’ line to define the
starting grammar rule, where parsing begins (this is just a grammar rule, and can be
anything you want; calling it
‘prog’ to signify the root is a
convention)
grammar myGrammarName ;
prog: grammarRulesForThisLanguage ;
-
A grammar rule starts with a name, then a
colon :, then the rule itself, and ends with
a semicolon ;
-
You can add alternatives (different parsing
paths) with the bar |
myrule: alternative1
| alternative2
| alternative3;
-
There are non-terminals and terminals.
-
Non-terminals are the rules we define: they can be
split further
-
Terminals are the constants that cannot be split
further
-
You can express terminals using a
regex-like syntax.
|
Functionality
|
Example
|
Accepted sentences
|
|
Strings
|
HELLO: ‘hello’
;
|
hello
|
|
bracket_int: ‘(‘
INT ‘)’ ;
|
(5)
(26)
(456)
|
|
Or
|
VOWEL:
(‘a’|‘e’|‘i’|‘o’|‘u’)
;
|
a
e
i
o
u
|
|
Match anything in set
|
VOWEL: [aeiou] ;
|
a
e
i
o
u
|
|
Range
|
DIGIT: [0-9] ;
|
2
7
9
|
|
ALPHA: [0-9a-zA-Z] ;
|
8
y
B
|
|
0 or more
|
MANY_C: ‘c’*
;
|
(nothing; empty string)
c
cccc
|
|
1 or more
|
INT: DIGIT+ ;
|
3
46
7723
|
|
0 or 1
|
PLURAL: ‘one’
‘s’?
|
one
ones
|
-
There are two kinds of rules: lexer rules
and parser rules.
|
Lexer rules
|
Parser rules
|
-
Denoted in UPPER
CASE.
-
Describes tokens
ID: [a-zA-Z]+ ;
INT: [0-9]+ ;
NEWLINE: ‘\r’?
‘\n’;
WS: [ \t]+ -> skip ;
|
-
Denoted in lower
case.
-
Describes syntax
stat: expr NEWLINE
| ID
‘=’ expr
NEWLINE
| NEWLINE
;
expr: expr
(‘*’|’/’)
expr
| expr
(‘+’|’-’)
expr
| INT
| ID
| ‘(‘
expr ‘)’
;
|
|
grammar Expr ;
prog: stat+ ;
stat: expr NEWLINE
| ID
‘=’ expr
NEWLINE
| NEWLINE
;
expr: expr
(‘*’|’/’)
expr
| expr
(‘+’|’-’)
expr
| INT
| ID
| ‘(‘
expr ‘)’
;
ID: [a-zA-Z]+ ;
INT: [0-9]+ ;
NEWLINE: ‘\r’?
‘\n’ ;
WS: [ \t]+ -> skip ; // ‘-> skip’ is
used to ignore whitespace
|
|
-
ANTLR generates recursive-descent parsers (if you remember from PLC, those are LL parsers, and work
like context-free grammars).
-
You can define grammar rules like this:
|
Grammar rule
|
Matches
|
|
assign : ID '=' expr ';' ;
|
foo = 1;
bar = 2;
|
-
We’ve created an assignment rule.
-
Now our parser can recognise when we’re trying to
assign a value to something.
-
The method that ANTLR generates for this rule looks like
this:
|
The actual code
|
|
void assign() {
match(ID);
match('=');
expr();
match(';');
}
|
-
That’s just an assignment though.
-
What a boring language it’d be if all it could do was
assign values!
-
We could create a more general ‘statement’
rule:
|
Grammar rule
|
Matches
|
|
stat: assign
| ifstat
| whilestat
...
;
|
foo = 1;
bar = 2;
if (true) { ... }
while (1 == 1) { ... }
|
-
These different paths: assignment, if statement, and while
loop, are called alternatives.
-
The method that ANTLR generates for our statement rule
looks like this:
|
The actual code
|
|
void stat() {
switch ( <<current input token>> )
{
case ID: assign(); break;
case IF: ifstat(); break;
case WHILE: whilestat(); break;
...
default: <<raise no viable alternative
exception>>
}
}
|
-
Notice how ANTLR has to use lookahead tokens to determine
if we’re doing an assignment, an if statement, or a
while loop.
-
By ‘lookahead token’, I mean the parser has to
see if the next token is an id, ‘if’, or
‘while’.
-
ANTLR handles all of this logic for you, so don’t
worry too much; just keep it in mind.
|
Example
Windows 98 maze screensaver
|
-
Let’s say there’s a maze, with
one entrance and one exit.
-
There are words all across the floor. Every
sequence of words along a path from the
entrance to the exit represents a valid
sentence in our language.
-
Given a sentence, if you can make a path
from the entrance to the exit using the
words in the sentence, you have a valid
sentence in the language.
-
If you hit a fork in the road, which path
do you choose?
-
You look at each path and see which words
correlate to the next words in your
sentence.
-
Basically, you lookahead!
-
What if there are multiple ways to reach
the exit with the same sentence?
-
Then the sentence is ambiguous in its
semantics.
|
-
Wanna hear an ambiguous sentence?
“You Can’t Put Too Much Water into a Nuclear
Reactor”
-
you’re not allowed to put too much water in, because
if you do, something bad will happen
-
it is impossible to put too much water in, so put in as
much as you like
“To my Ph.D supervisor, for whom no thanks is too
much”
-
the supervisor is so good, no amount of thanks would be too
much
-
the supervisor is so bad, even not thanking them is giving
them too much credit
-
Here’s another, but it’s an ambiguous
grammar:
|
Grammar rule
|
Matches
|
|
stat: expr ';'
| ID '(' ')' ';'
;
expr: ID '(' ')'
| INT
;
|
f();
foo();
bar();
|
-
This grammar recognises function calls, but it can do it in
two ways:
|
f(); as expr
|
f(); as stat
|
|
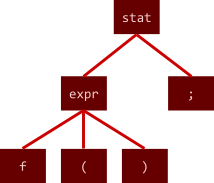
|
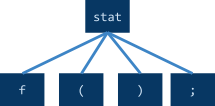
|
-
When this happens, ANTLR picks the first rule specified in
the grammar.
-
So f(); would be represented as an expr.
-
This happens in lexing too:
|
Grammar rule
|
Matches
|
|
BEGIN: ‘begin’ ;
ID: [a-z]+ ;
|
begin
|
-
The word ‘begin’ can be classed as either BEGIN
or ID.
-
ANTLR picks the first rule specified, so
‘begin’ will be classed as BEGIN.
Listeners
-
So, we can define languages and generate ASTs from source
code.
-
But this is Automated Code Generation! Where’s the generated code?
-
In ANTLR, we can do more with our ASTs than just create
them.
-
We can traverse them, and run some code based on what we
run into.
-
There’s two ways to traverse our ASTs:
-
They both achieve the same thing, but one approach may be
more convenient for certain tasks than the other.
-
Listeners use an event-driven model.
-
ANTLR has a ‘tree walker’ that traverses across
the parse tree, and fires off certain events when it reaches
certain nodes.
-
There are two events per parse rule R:
-
As you can probably guess, they are fired off when the
parse tree enters a node with parse rule R and when the
parse tree leaves a node with parse rule R.
-
Let’s look at an example:
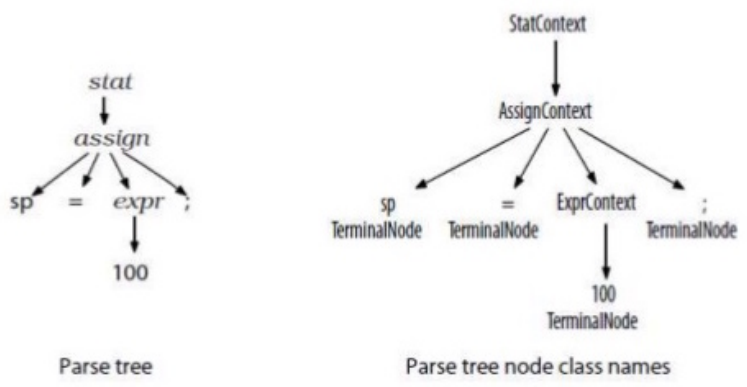
-
On the left, we have a parse tree of sp = 100;
-
On the right, we have that same tree, but with each
node’s class name.
-
If “Foo” is the name of the grammar, and if we
wanted to run some code when the tree walker reached our
expression “100”, we can override the
“enterExpr” method in our FooBaseListener.
-
How does the tree walker actually traverse through the
tree?
-
It uses depth-first search:
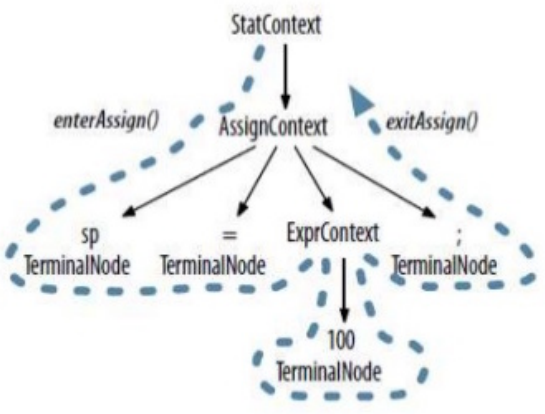
-
Here’s all the event callbacks that would be run,
from start to finish:
|
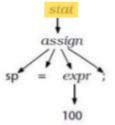
|
enterStat(StatContext)
|
|
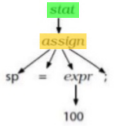
|
enterAssign(AssignContext)
|
|
|
visitTerminal(TerminalNode)
|
|
|
visitTerminal(TerminalNode)
|
|
|
enterExpr(ExprContext)
|
|
|
visitTerminal(TerminalNode)
|
|
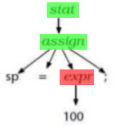
|
exitExpr(ExprContext)
|
|
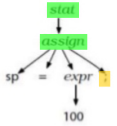
|
visitTerminal(TerminalNode)
|
|
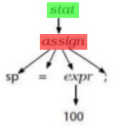
|
exitAssign(AssignContext)
|
|

|
exitStat(StatContext)
|
Software Sec Example
-
Let’s have a proper example!
-
There’s no coursework for this, so I’ll guide
you how to compile all this yourself.
-
Call it a Notes Network lab!
-
Let’s say you’re doing Software Security, and you want to convert lists of numbers into hex value
strings so you can pipe them into insecure C programs.
-
So, we have:
-
... and we want to convert it to:
-
“\u0001\u0006\u0007\u0053\u000C”
-
I know; we could just write a method for this, but
let’s go along with this.
-
Let’s define a grammar for this, and save it as ArrayInit.g4:
|
ArrayInit.g4
|
|
grammar ArrayInit;
// A rule called list that matches
comma-separated values between { ... }.
list: '{' value (',' value)* '}' ; // must match at least one value
// A value can be either a nested array/struct
or a simple integer (INT)
value: list
| INT
;
// Parser rules start with lowercase letters,
lexer rules with uppercase
INT: [0-9]+ ;
// Define token INT as one or more digits
WS: [ \t\r\n]+ -> skip ; // Define whitespace rule, toss it out
|
-
You really should have ANTLR installed.
- Do you?
|
Of course! I’m well-behaved and I follow
the rules.
|
No way! ANTLR sucks like everything else.
|
|
Good job!
I don’t have any rewards to give you, so,
um... here’s a monad.
(>>=) :: ma → (a → mb) →
mb
|
Yare yare... you can’t follow along if
you don’t have ANTLR.
Go and follow the instructions on the official site to install it, as well as the
commands.
Or, if you really don’t care, feel free
to read on.
|
-
I’m using the Linux commands, so if you’re on
Windows, just substitute my commands for yours.
-
Let’s compile the grammar:
-
Let’s check if it works!
-
Compile the Java code to bytecode into an output
folder:
|
$ javac ArrayInit*.java -d out
|
-
Now let’s parse a simple list and see its parse
tree:
|
$ cd out
$ grun ArrayInit list -gui
{1,2,3}
CTRL + D
|
-
(If you’re on Unix, remember, input a number list and
press CTRL+D to show the tree. On Windows, it’s CTRL +
Z.)
-
You should see something like this appear:
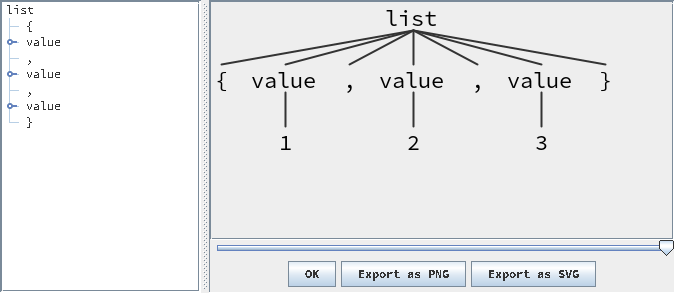
-
Wahoo! We have our language, and it parses lists
correctly.
-
Now, how do we actually convert this list to hex
values?
-
The general idea is this:
-
When we enter ‘list’, we’ll print opened
double quotes “
-
When we enter a value, we’ll convert it to hex and
print it.
-
When we exit ‘list’, we’ll print closed
double quotes ”
-
How do we do that?
-
Remember the ‘events’ from earlier?
-
The three events we need are:
-
enterList
-
enterValue
-
exitList
-
How do we attach code to those events?
-
We do so by making a new class that extends ArrayInitBaseListener:
|
ShortToUnicodeString.java
|
|
public class ShortToUnicodeString extends
ArrayInitBaseListener {
@Override
public void enterList(ArrayInitParser.ListContext ctx) {
System.out.print('"');
}
@Override
public void enterValue(ArrayInitParser.ValueContext ctx) {
int value =
Integer.valueOf(ctx.INT().getText());
System.out.printf("\\u%04x", value);
}
@Override
public void exitList(ArrayInitParser.ListContext ctx) {
System.out.println('"');
}
}
|
-
Cool! Now, when we enterList, we print an open quote. Each time we enterValue, we print the hex value of it. When we exitList, we close the quotes.
-
You’ll notice that, in the Contexts, you can
reference parts of the parsing rule by their name in the
grammar.
-
For example, when we enterValue, we can reference the INT token with ctx.INT().
-
There are no checks for whether the value is one with list or with INT, because it doesn’t support nested lists yet.
-
Yes, very cool, but, um... how do we actually run it?
-
We need a Main class that:
-
Loads up some ArrayInit source code
-
Computes the parse tree
-
Walks through the parse tree with our new listener
|
Main.java
|
|
import org.antlr.v4.runtime.*;
import org.antlr.v4.runtime.tree.*;
import static org.antlr.v4.runtime.CharStreams.fromFileName;
public class Main {
public static final String FILENAME = "test.txt";
public static void main(String[] args) throws Exception {
var inputStream = getInputStream();
var parseTree = getParseTree(inputStream);
walkThroughParseTreeWithListener(parseTree, new ShortToUnicodeString());
}
|
|
public static CharStream getInputStream() throws
Exception {
return fromFileName(FILENAME);
}
|
|
public static ParseTree getParseTree(CharStream
inputStream) {
var lexer = new ArrayInitLexer(inputStream);
var tokens = new CommonTokenStream(lexer);
var parser = new ArrayInitParser(tokens);
return parser.list();
}
|
|
public static void
walkThroughParseTreeWithListener(ParseTree
parseTree, ParseTreeListener listener) {
var walker = new ParseTreeWalker();
walker.walk(listener,
parseTree);
}
}
|
-
Don’t forget to write some ArrayInit source code into a text file for our program to
read!
|
out/test.txt
|
|
{1,6,7,83,12}
|
-
Now, we can finally compile everything again and give it a
spin:
|
$ javac *.java -d out
$ cd out
$ java Main
"\u0001\u0006\u0007\u0053\u000c"
|
-
It’s like PLC all over again 😊
-
Let’s take a step back and look at what we’re
actually doing here.
-
We’re writing a whole new language just to convert
integers to a hex string.
-
That’s like creating an English Two just to say
hello.
-
Can we do something more complicated with this?
- Yes!
-
Did you know that, with a grammar for Java, you can walk
through Java code?
-
You can do things like:
-
Creating interfaces out of classes
-
Convert interfaces to abstract classes
-
Print information about a Java program
-
Change all programming patterns to monads
-
There’s an example in the slides for making
interfaces out of classes, but the main points are:
-
Use events like enterClassDeclaration,
exitClassDeclaration, enterMethodDeclaration,
exitMethodDeclaration.
-
Print interface I { on entering a class, and a closing brace } on exiting a class.
-
On entering a method, get the type and parameters using the tokens.getText method on parts of the parse tree that point to the
method type and parameters, respectively (this gets the input text that caused it to match that bit
of the parse tree), then print them as a method declaration in the
interface.
Visitors
-
Let’s summarise what the Visitor pattern is, exactly (in terms of ANTLR):
-
There exists a Visitor interface containing the visit method, which performs some kind of logic on a part
of the overall structure.
-
On each element of the structure, there exists an accept method, which runs the correct visit method for that
type of element.
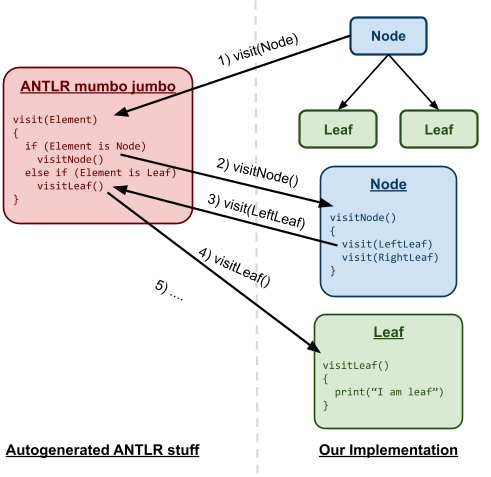
-
Hmm... that diagram may have made it more confusing.
-
Let’s just talk about it for now 😅
-
As an alternative to listeners, ANTLR provides visitors for
the nodes in our parse tree.
-
The difference is this:
-
With listeners, you get both ‘enter’ and ‘exit’
methods for the traversal, but the traversal doesn’t
return anything.
-
With visitors, you only get methods for ‘visiting’ the
nodes, but the traversal has a return value.
-
So, for tasks that don’t have an aggregated return
value, listeners might be more helpful, like converting Java
classes to interfaces and writing it to a separate
file.
-
However, visitors would be more helpful for tasks with an
aggregated value, like finding the sum of all numbers in a
binary tree, where each node has a value.
-
What if we just had another Notes Network lab? Then I can
explain things in order.
Binary Tree Example
-
In this example, we’re going to make a binary tree
language, where each parent has two children, and each node
has a number, like so:
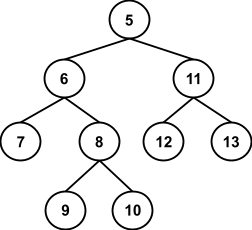
-
We’re going to make two visitors:
-
One that sums all the numbers in the tree
-
One that gets the maximum number in the tree
-
First, let’s make that language!
|
BinaryTree.g4
|
|
grammar BinaryTree ;
binarytree: '(' value subtree subtree ')';
subtree: value | binarytree ;
value: INT ;
INT: [0-9]+ ;
// Define token INT as one or more digits
WS: [ \t\r\n]+ -> skip ; // Define whitespace rule, toss it out
|
-
With this, we can represent the tree above as:
-
(5 (6 7 (8 9 10)) (11 12 13))
|
Debugger’s note
|
|
As I was writing this binary tree grammar, I
kept running into syntax errors. It was really
strange; I could’ve sworn my ANTLR syntax
was perfect.
Turns out, ANTLR doesn’t like the word
‘tree’ as a parsing rule name.
¯\_(ツ)_/¯
|
-
Let’s give this a try!
-
Compile the language:
|
$ antlr4 ArrayInit.g4 -visitor
|
-
Don’t forget the -visitor flag, we’ll need it later.
-
Let’s try parsing our tree from above:
|
$ javac *.java -d out
$ cd out
$ grun BinaryTree binarytree -gui
(5 (6 7 (8 9 10)) (11 12 13))
CTRL + D
|
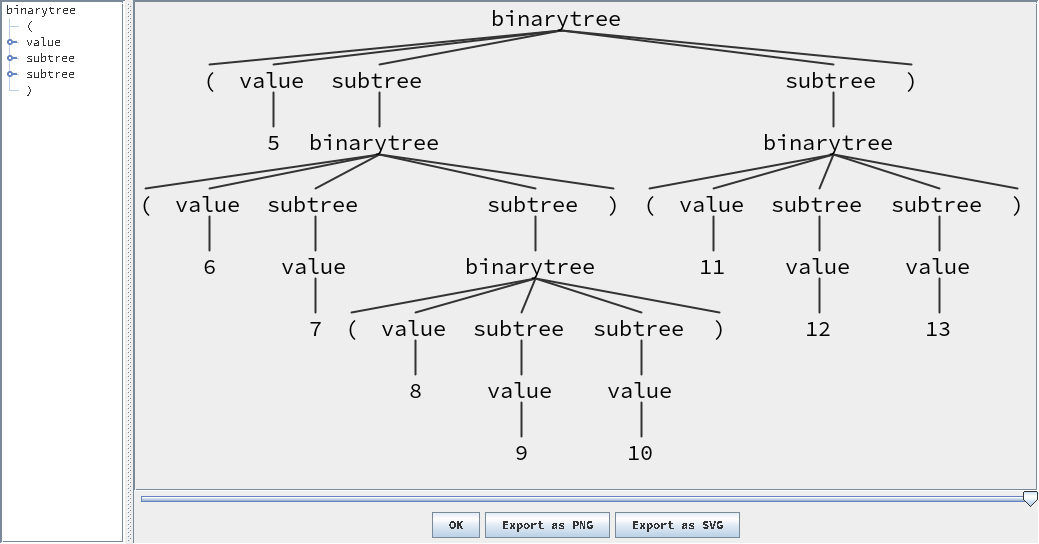
-
Looks good to me!
-
Now, let’s write our visitors.
-
Like listeners, we need to make a new class.
-
This time though, it needs to extend the base visitor class
instead of the base listener class:
|
BinaryTreeSumVisitor.java
|
|
public class BinaryTreeSumVisitor extends BinaryTreeBaseVisitor<Integer>
{
@Override
public Integer visitBinarytree(BinaryTreeParser.BinarytreeContext ctx) {
int val = visit(ctx.value());
int leftVal = visit(ctx.subtree(0));
int rightVal = visit(ctx.subtree(1));
return val + leftVal + rightVal;
}
@Override
public Integer visitSubtree(BinaryTreeParser.SubtreeContext ctx) {
return visitChildren(ctx);
}
@Override
public Integer visitValue(BinaryTreeParser.ValueContext ctx) {
int val =
Integer.valueOf(ctx.INT().getText());
return val;
}
}
|
-
Unlike listeners, visitors are parameterised on the return
type of the visitor function.
-
Our sum visitor is returning an integer: the sum, so we
parametrize it on Integer.
-
We cover each case of visiting each node:
-
When we visit a binary tree, add up the value, the left
subtree sum, and the right subtree sum, and return
that.
-
When we visit a subtree, just return whatever the children
return (it’s going to be a value or another binary tree
anyway)
-
When we visit a value, get the integer of this node and
return it.
-
Cool! Now let’s whip up a quick Main method, similar
to the one in the listeners example, to test this:
|
Main.java
|
|
import org.antlr.v4.runtime.*;
import org.antlr.v4.runtime.tree.*;
import static org.antlr.v4.runtime.CharStreams.fromFileName;
public class Main {
public static final String FILENAME = "test.txt";
public static void main(String[] args) throws Exception {
var inputStream = getInputStream();
var parseTree = getParseTree(inputStream);
var sum = walkThroughParseTreeWithSumVisitor(parseTree);
System.out.println("Sum:
" + sum);
}
|
|
public static CharStream getInputStream() throws
Exception {
return fromFileName(FILENAME);
}
|
|
public static ParseTree getParseTree(CharStream
inputStream) {
var lexer = new ArrayInitLexer(inputStream);
var tokens = new CommonTokenStream(lexer);
var parser = new ArrayInitParser(tokens);
return parser.binarytree();
}
|
|
public static int walkThroughParseTreeWithSumVisitor(ParseTree parseTree) {
var visitor = new BinaryTreeSumVisitor();
var sum =
visitor.visit(parseTree);
return sum;
}
}
|
-
Of course, don’t forget the binary tree source
code!
|
out/test.txt
|
|
(5 (6 7 (8 9 10)) (11 12 13))
|
-
Now, let’s give this a test:
|
$ javac *.java -d out
$ cd out
$ java Main
Sum: 81
|
-
Woohoo! It worked!
-
Now, let’s try that maximum number visitor:
|
BinaryTreeMaxVisitor.java
|
|
public class BinaryTreeSumVisitor extends BinaryTreeBaseVisitor<Integer> {
@Override
public Integer visitBinarytree(BinaryTreeParser.BinarytreeContext ctx) {
int val = visit(ctx.value());
int leftVal = visit(ctx.subtree(0));
int rightVal = visit(ctx.subtree(1));
if (val > leftVal && val >
rightVal)
return val;
if (leftVal > rightVal)
return leftVal;
return rightVal;
}
@Override
public Integer visitSubtree(BinaryTreeParser.SubtreeContext ctx) {
return visitChildren(ctx);
}
@Override
public Integer visitValue(BinaryTreeParser.ValueContext ctx) {
int val =
Integer.valueOf(ctx.INT().getText());
return val;
}
}
|
-
It’s virtually the same, except for the visitBinaryTree method, which returns the biggest number instead of
summing them all.
-
Let’s tweak the main method to use this visitor
now:
|
Main.java
|
|
...
public class Main {
public static final String FILENAME = "test.txt";
public static void main(String[] args) throws Exception {
...
var max = walkThroughParseTreeWithMaxVisitor(parseTree);
System.out.println("Max:
" + max);
}
|
|
public static int walkThroughParseTreeWithMaxVisitor(ParseTree parseTree) {
var visitor = new BinaryTreeMaxVisitor();
var max =
visitor.visit(parseTree);
return max;
}
}
|
-
Let’s compile, run Main, and see if we really get the
biggest node value:
|
$ javac *.java -d out
$ cd out
$ java Main
Sum: 81
Max: 13
|
-
Would you look at that? It found the biggest node in the
tree!
Other Features
Alternative Labels
-
You can label parsing rules to control the names of the
listener and visitor methods:
|
expr: expr (‘*’|’/’) expr # MulDiv
| expr (‘+’|’-’) expr # AddSub
| INT
# int
| ID
# id
| ‘(‘ expr ‘)’ # parens
;
|
-
They look like comments, but they’re not!
-
When you name rules like these, you can get methods
like:
-
visitMulDiv
-
visitAddSub
-
visitInt
-
visitId
-
visitParens
Rule Element Labels
-
In a parsing rule, you can name a token to reference
later:
|
expr: value op=(‘+’|’-’|‘*’|’/’) value ;
ADD: ‘+’;
SUB: ’-’;
MUL: ‘*’;
DIV: ’/’;
|
-
Then, when you have a Context object for this rule through
a listener or visitor method, you can refer to the token
using the name you’ve given it:
|
public Integer visitExpr(MyGrammarParser.ExprContext ctx) {
switch (ctx.op.getType())
{
case MyGrammarParser.ADD:
System.out.println("This is an addition
expression");
break;
case MyGrammarParser.SUB:
System.out.println("This is a subtraction
expression");
break;
case MyGrammarParser.MUL:
System.out.println("This is a multiplication
expression");
break;
case MyGrammarParser.DIV:
System.out.println("This is a division expression");
break;
}
}
|
Actions
-
Actions are blocks of code, encapsulated by { }, that you can run in your parsing rules.
- Like so:
|
expr: INT ‘+’ INT { System.out.println(“You’ve just added”); } ;
|
-
You can also have semantic predicates, which are actions that return true or false, and if they
return false, the parsing rule is skipped.
-
They are encapsulated with { }?
-
Here’s an example that only adds two numbers if
they’re both non-negative:
|
expr: a=INT ‘+’ b=INT { Integer.parseInt($a.text) >= 0
&&
Integer.parseInt($b.text) >= 0; }? ;
|
Node Values (Attributes)
-
When you’re in an action, you can reference parts of
the parse rule.
-
These are called attributes, and they must be prefixed with a $.
-
We’ve already done this above, but you can reference
the tokens as token attributes:
|
expr: INT { System.out.println(“int value: “ + $INT.text); };
|
-
ANTLR also allows parse tree nodes to store values.
-
You can think of this like a node
‘state’.
-
Return attributes are among such so-called rule attributes.
-
They can be changed using actions.
-
Here’s an example of an adding parse rule that stores
the result in itself:
|
expr returns [int value]
: a=INT '+' b=INT {$value
= Integer.parseInt($a.text) +
Integer.parseInt($b.text);
}
;
|
-
Now, we can access the ‘value’ property of expr
nodes:
|
public Integer visitExpr(MyGrammarParser.ExprContext ctx) {
ctx.value; // This will equal the matched ‘a’
+ the matched ‘b’
}
|
-
You can only store one value, though.
-
Another solution is mapping nodes to values, which you can
do with the ParseTreeProperty<T> class.
TokenStreamRewriter
-
When we use a lexer, we get a token stream.
-
A token stream is just like normal streams in Java, but the
elements are the tokens making up the input source
code.
-
Did you know that it’s possible to
‘modify’ a token stream using a TokenStreamRewriter?
-
Here’s a quick example of one, with a simple language
of just two words: ‘bold’ and
‘deleteme’.
-
The TokenStreamRewriter here puts asterisks around ‘bold’ tokens
and removes all ‘deleteme’ tokens:
|
TSR.g4
|
|
grammar TSR;
program: programm EOF;
programm: bold
| deleteme
| bold
programm
| deleteme
programm;
bold: BOLD;
deleteme: DELETEME;
BOLD: ‘bold’;
DELETEME: ‘deleteme’;
WS: [ \t\r\n]+ -> skip ;
|
|
TSRMyListener.java
|
|
import org.antlr.v4.runtime.*;
public class TSRMyListener extends TSRBaseListener {
public TokenStreamRewriter rewriter;
public TSRMyListener(TokenStream tokens) {
rewriter = new TokenStreamRewriter(tokens);
}
@Override
public void enterBold(TSRParser.BoldContext ctx) {
rewriter.insertBefore(ctx.BOLD().getSymbol(), '*');
rewriter.insertAfter(ctx.BOLD().getSymbol(), '*');
}
@Override
public void enterDeleteme(TSRParser.DeletemeContext ctx) {
rewriter.delete(ctx.DELETEME().getSymbol());
}
}
|
|
Main.java
|
|
import org.antlr.v4.runtime.*;
import org.antlr.v4.runtime.tree.*;
import static org.antlr.v4.runtime.CharStreams.fromFileName;
public class Main {
public static final String FILENAME = "test.txt";
public static void main(String[] args) throws Exception {
var inputStream =
fromFileName(FILENAME);
var lexer = new TSRLexer(inputStream);
var tokens = new CommonTokenStream(lexer);
var parser = new TSRParser(tokens);
var parseTree =
parser.program();
var walker = new ParseTreeWalker();
var listener = new TSRMyListener(tokens);
walker.walk(listener,
parseTree);
// Reads new token stream
System.out.println(listener.rewriter.getText());
}
}
|
|
out/test.txt
|
|
bold deleteme bold deleteme bold
|
-
Now, let’s give this a test:
|
$ javac *.java -d out
$ cd out
$ java Main
*bold**bold**bold*
|
-
Keep in mind that to make a TokenStreamRewriter, you need
to feed it the original TokenStream.
-
However, TokenStreamRewriters do not mutate the original
TokenStream at all (hence why I used ‘’ around the word
‘modify’ earlier).
-
Instead, TokenStreamRewriters store buffered changes, and they’re only
computed when you run the getText method on the TokenStreamRewriter.
-
They’re useful for when your program is doing slight
modifications to some kind of input, like adding a
‘implements I’ bit to your classes as you’re generating
interfaces.
Why ANTLR Sucks
-
Alas... according to Automated Code Generation, everything
sucks.
-
ANTLR is no exception.
-
It’s really good for expressing grammars, generating
parsers, and walking through parse trees.
-
However, it’s not great for transforming parse trees
to ASTs.
-
To generate code using listeners and visitors, you’re
essentially:
-
Writing strings
-
Rewriting token streams
-
Manually building AST nodes of the generator target
-
So if ANTLR is crap at code generation, why are we learning
it?
-
The key thing to take away here is:
-
generalised input and
-
traversal over model structures.
-
It’s not really a transformation tool, but it meets
the above points well for textual domain models.
-
If you wanna find out more about transformation tools for
textual domain models, check out Stratego.
-
There’s plenty of graphical ones too:
-
Acceleo
- JET
-
Epsilon
- ATL
- Xpand